# SSO Configuration - Azure (Microsoft)

## SSO Configuration Process for using the FinOps Platform

#### Welcome to Pier Cloud!

Pier Cloud is our centralized platform for managing cloud data and services. Our priority is to ensure that access to resources is secure, convenient, and efficient. This document was elaborated to guide you through setting up access to Pier Cloud via Single Sign-On (SSO).

This guide covers the steps required to set up SSO with Pier Cloud, including integration with external identity providers such as Microsoft Azure Active Directory. You'll find detailed instructions, along with screenshots and examples, to make the setup process easier.

If you have any questions during the setup process or need additional assistance, please don’t hesitate to contact our support team. We are here to help ensure a smooth transition to SSO access and maximize the benefits that Pier Cloud offers.

####

#### Below are the steps required to configure SSO using the Azure Active Directory provider.
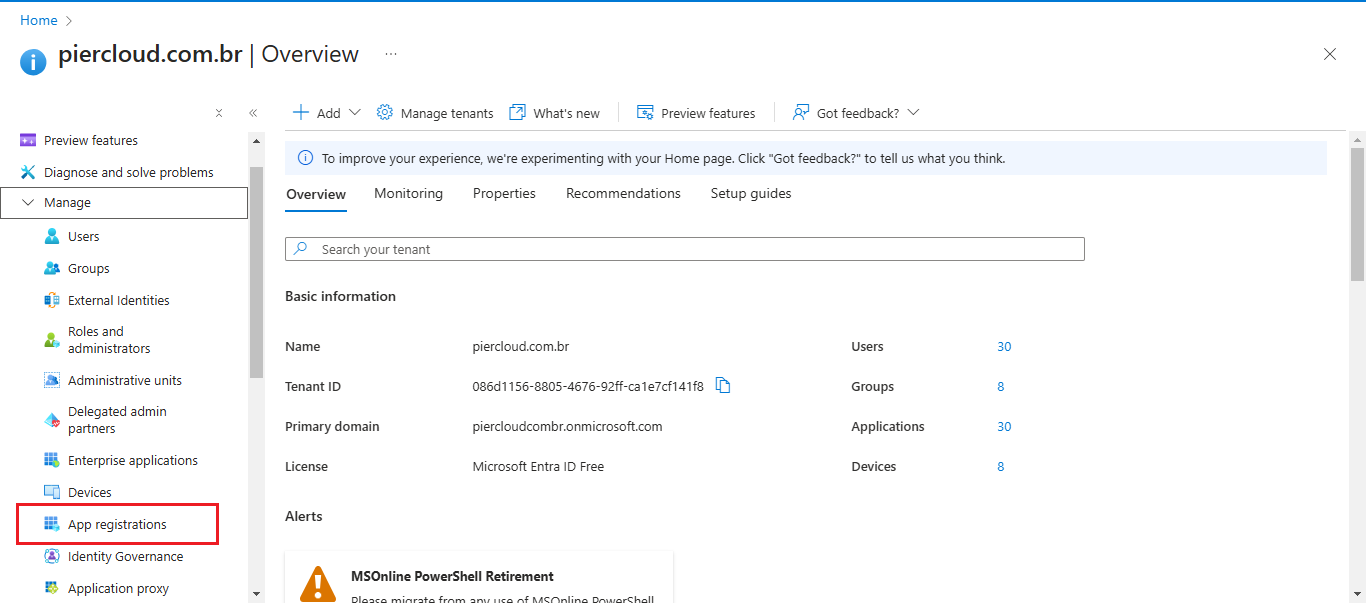
1. Go to <mark style="color:blue;"><https://portal.azure.com/></mark> and access the Microsoft Entra ID menu:

<figure><img src="https://1687673077-files.gitbook.io/~/files/v0/b/gitbook-x-prod.appspot.com/o/spaces%2FZ9sinLUl52lDK1vg6b8g%2Fuploads%2FThG9VUIYb8kRKRU2KR9G%2Fimage.png?alt=media&#x26;token=ccec4192-f6e9-4146-8d74-1a8f605b0cc9" alt=""><figcaption></figcaption></figure>

2. In the **Microsoft Entra ID** section, select the **App registrations** option in the side menu:

<figure><img src="https://1687673077-files.gitbook.io/~/files/v0/b/gitbook-x-prod.appspot.com/o/spaces%2FZ9sinLUl52lDK1vg6b8g%2Fuploads%2FwItNy6o8Kz01VL9ZxyMC%2Fimage.png?alt=media&#x26;token=1e1cc1c2-75e4-4859-9857-bc23c5684eb3" alt=""><figcaption></figcaption></figure>

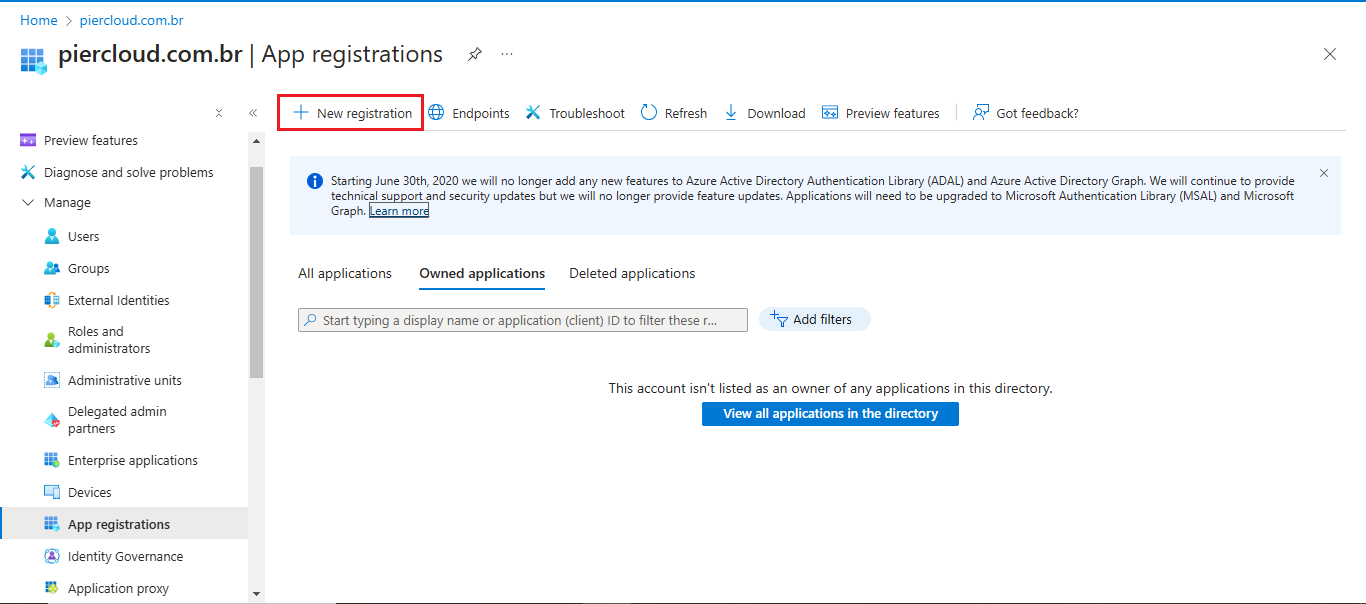
3. Click on the **New registration** button:
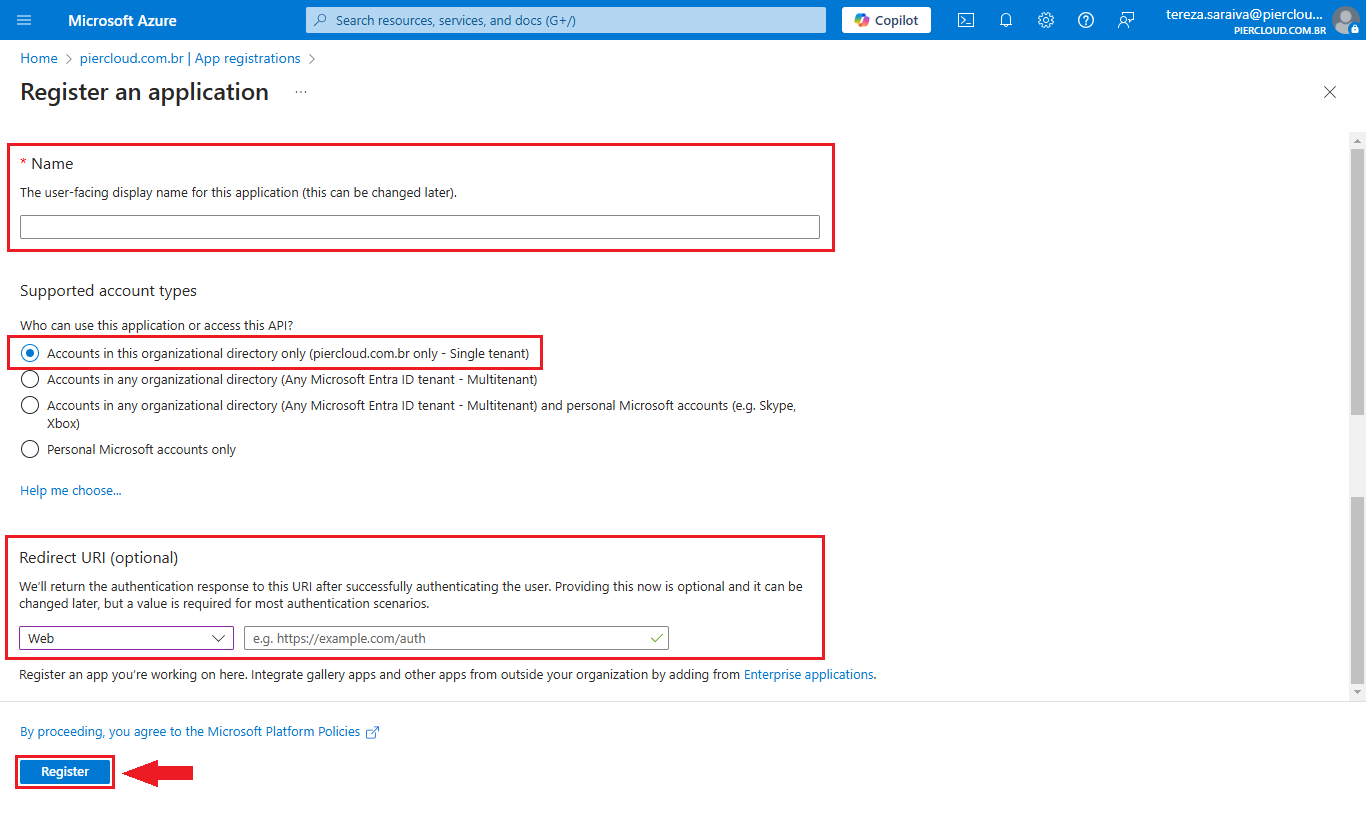
<figure><img src="https://1687673077-files.gitbook.io/~/files/v0/b/gitbook-x-prod.appspot.com/o/spaces%2FZ9sinLUl52lDK1vg6b8g%2Fuploads%2FylltKHK7zbdZ7sERbQZn%2Fimage.png?alt=media&#x26;token=c0008efd-7038-4246-b7fc-1202ea902914" alt=""><figcaption></figcaption></figure>

4. &#x20;On the application creation page, enter the following data:

   * App Name: "**piercloud-finops-platform-sso**"
   * Select the option "**Accounts in this organizational directory only  (DOMAIN only – Single tenant)**"
   * Select the Web option and **add the redirect URL provided by Pier Cloud.**

   Click on the "**Register**" button

<figure><img src="https://1687673077-files.gitbook.io/~/files/v0/b/gitbook-x-prod.appspot.com/o/spaces%2FZ9sinLUl52lDK1vg6b8g%2Fuploads%2FVSyyc8iISKfpjJ1n3JZZ%2Fimage.png?alt=media&#x26;token=d7323b1b-2fbe-4633-816a-dd94fbfdcd0a" alt=""><figcaption></figcaption></figure>

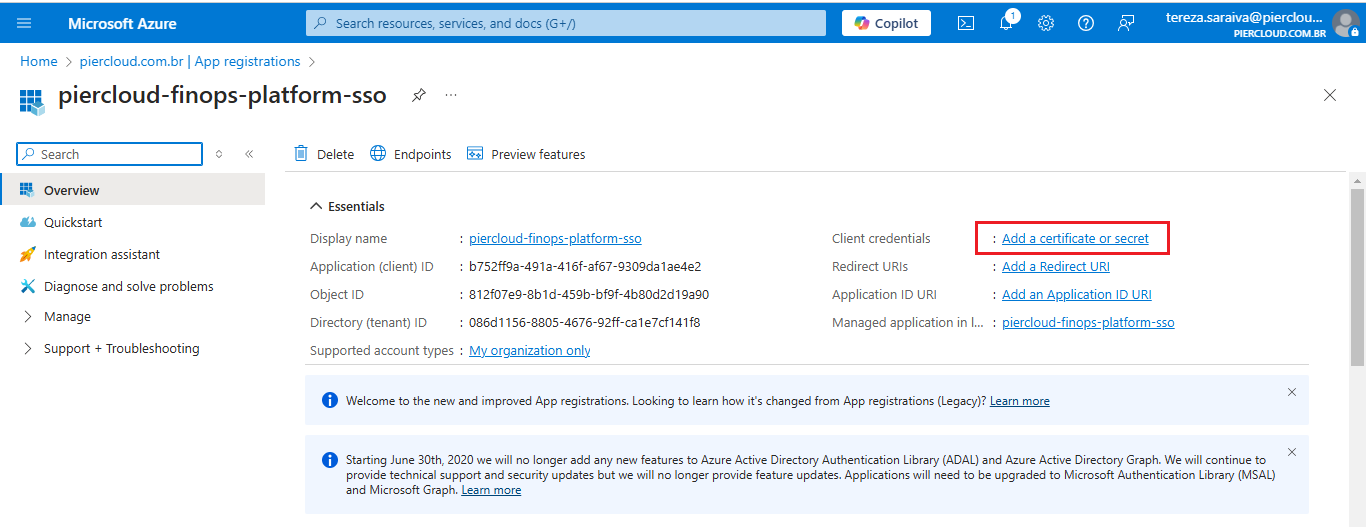
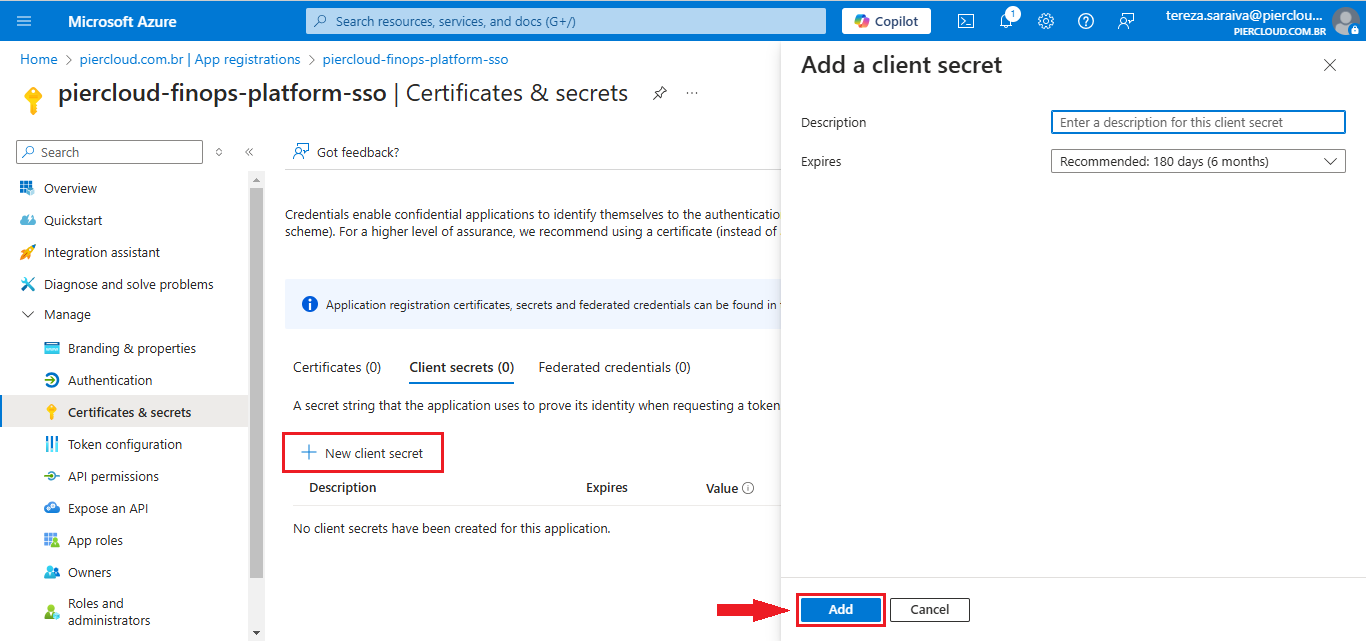
5. After creating the application, click on the option "**Add a certificate or secret**"

<figure><img src="https://1687673077-files.gitbook.io/~/files/v0/b/gitbook-x-prod.appspot.com/o/spaces%2FZ9sinLUl52lDK1vg6b8g%2Fuploads%2FhFRHmOHKqCZgnozMqVkh%2Fimage.png?alt=media&#x26;token=801bb231-f1e0-43ce-b4fd-617bd4a65eb5" alt=""><figcaption></figcaption></figure>

6. Click on the "**New client secret**" button. In the form on the side, click on the **Add** button:

<figure><img src="https://1687673077-files.gitbook.io/~/files/v0/b/gitbook-x-prod.appspot.com/o/spaces%2FZ9sinLUl52lDK1vg6b8g%2Fuploads%2FbSAkspDTdDuHMK4pVdQw%2Fimage.png?alt=media&#x26;token=c0bcf594-a42e-4d25-8974-157a17d4dca2" alt=""><figcaption></figcaption></figure>

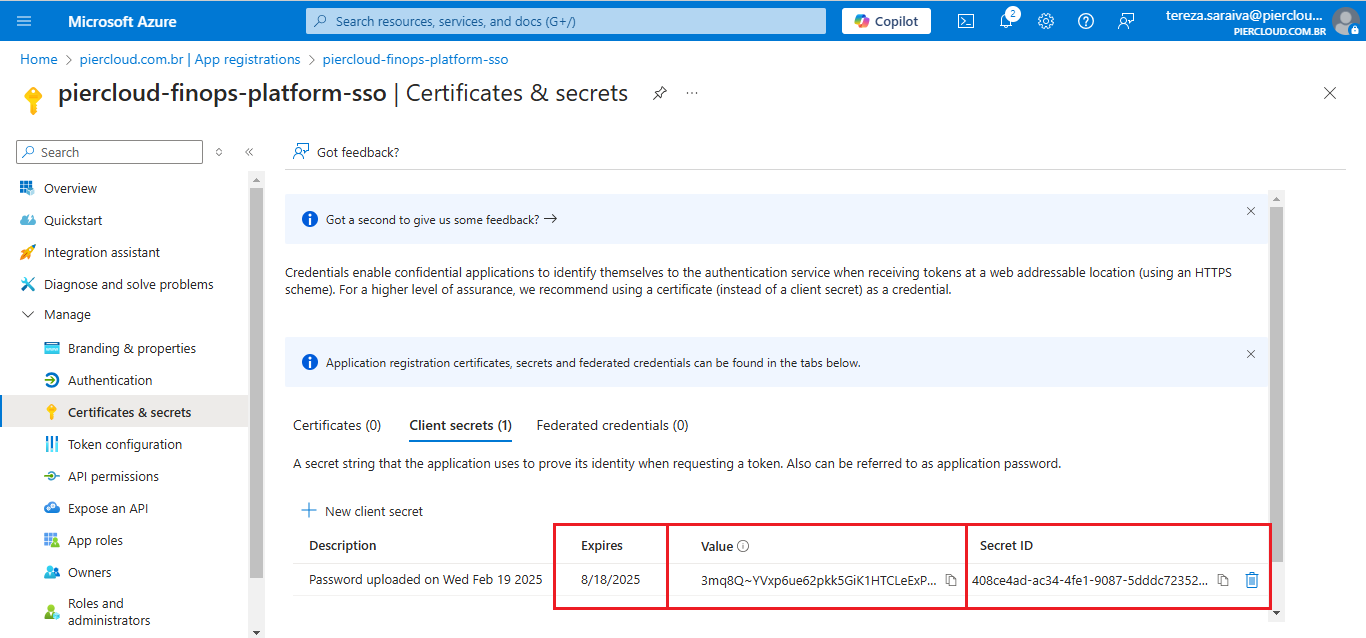
7. Send the generated **Value, Secret ID** and **Expiration Date** to the PierCloud team:

<figure><img src="https://1687673077-files.gitbook.io/~/files/v0/b/gitbook-x-prod.appspot.com/o/spaces%2FZ9sinLUl52lDK1vg6b8g%2Fuploads%2FiJ7d069S4VjWIxxHCuPj%2Fimage.png?alt=media&#x26;token=dbfda6e3-206a-4f24-82e1-0559b34eff1c" alt=""><figcaption></figcaption></figure>

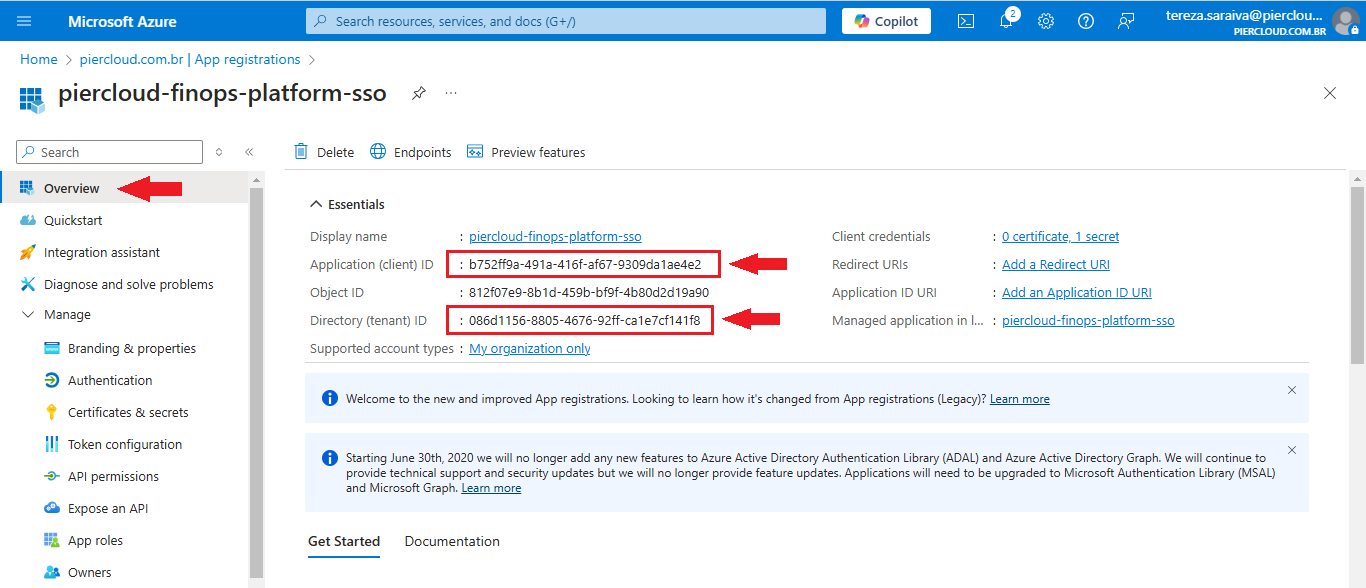
8. Click on Overview and send the **Application (client) ID** and **Directory (tenant) ID** to PierCloud team.

<figure><img src="https://1687673077-files.gitbook.io/~/files/v0/b/gitbook-x-prod.appspot.com/o/spaces%2FZ9sinLUl52lDK1vg6b8g%2Fuploads%2FK4kOK8SFfbGtSmOy8DQ2%2Fimage.png?alt=media&#x26;token=e5633bca-6f59-4d2d-abc6-87c6ff461d4b" alt=""><figcaption></figcaption></figure>

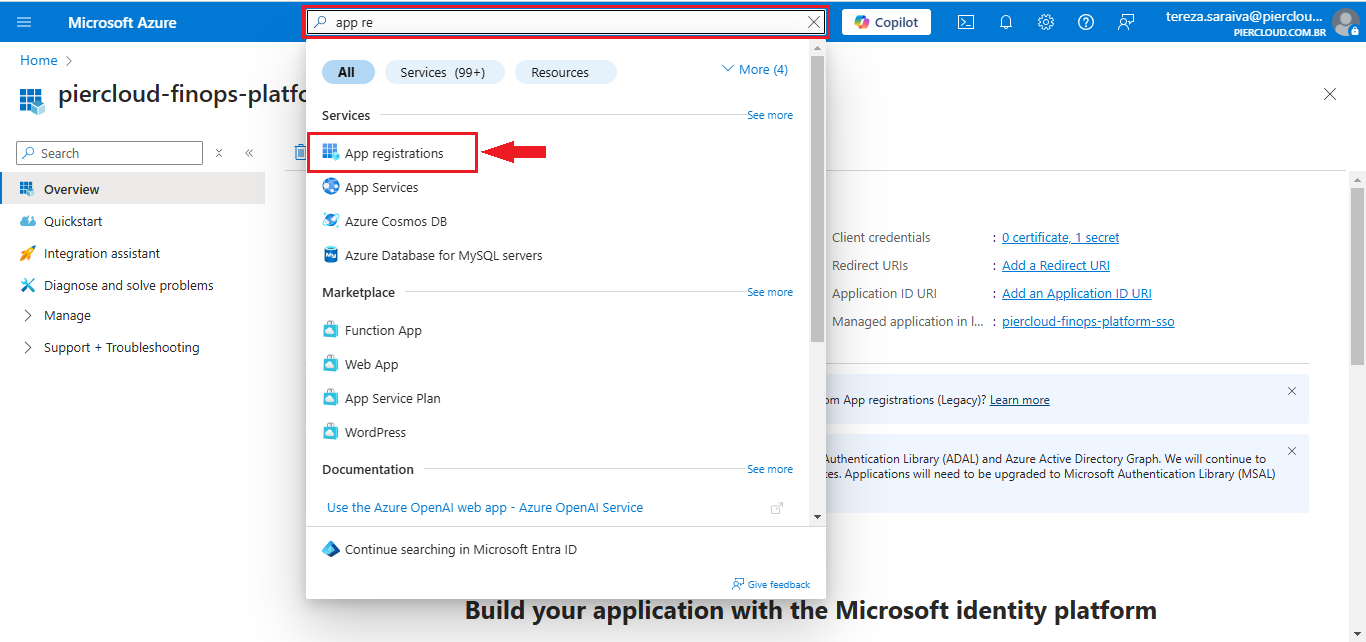
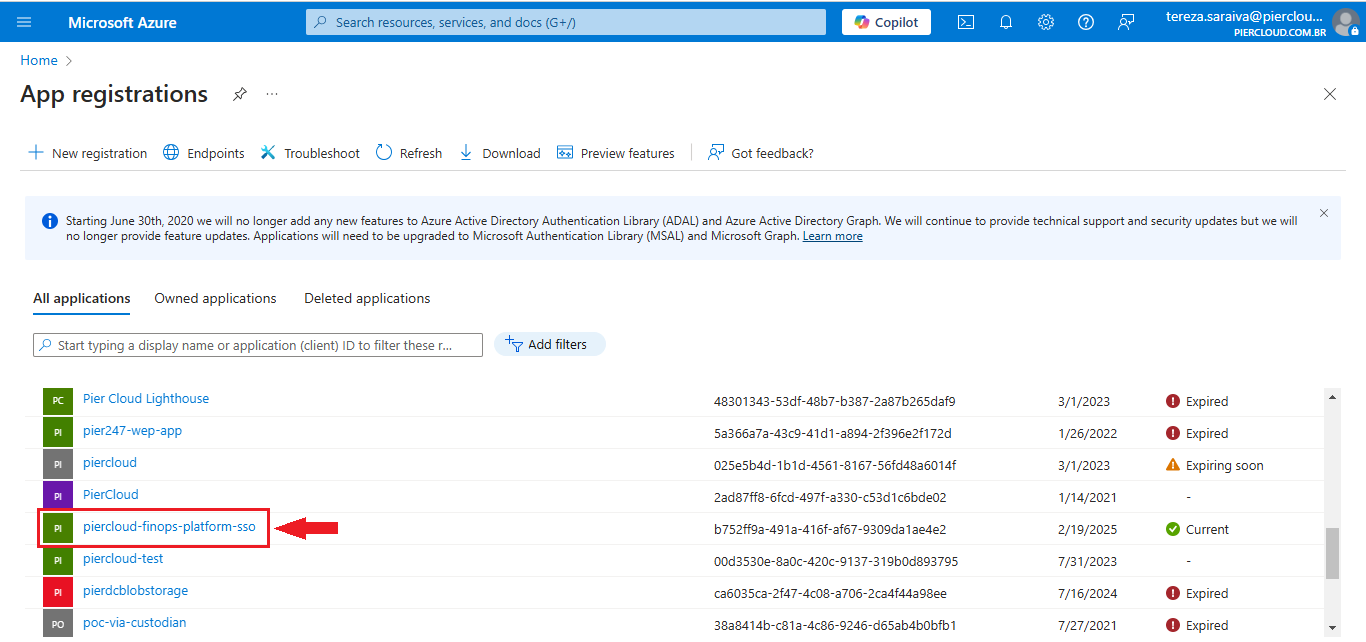
9. To continue we need to add some permissions, in the search field, look for **App registrations**, as illustrated in the image below.

<figure><img src="https://1687673077-files.gitbook.io/~/files/v0/b/gitbook-x-prod.appspot.com/o/spaces%2FZ9sinLUl52lDK1vg6b8g%2Fuploads%2FsYM0u5BitKzHoDVQyYsp%2Fimage.png?alt=media&#x26;token=f9681740-d4cb-4ab7-948c-2f76678db15a" alt=""><figcaption></figcaption></figure>

10. Here click on the created APP registration (in this case we will use an App created for testing "piercloud-finops-platform-sso") as illustrated in the image below.

<figure><img src="https://1687673077-files.gitbook.io/~/files/v0/b/gitbook-x-prod.appspot.com/o/spaces%2FZ9sinLUl52lDK1vg6b8g%2Fuploads%2Fm1BMstDFhKvxLby77gLZ%2Fimage.png?alt=media&#x26;token=17c5435d-03be-430e-9518-b4f4fcbb3a1a" alt=""><figcaption></figcaption></figure>

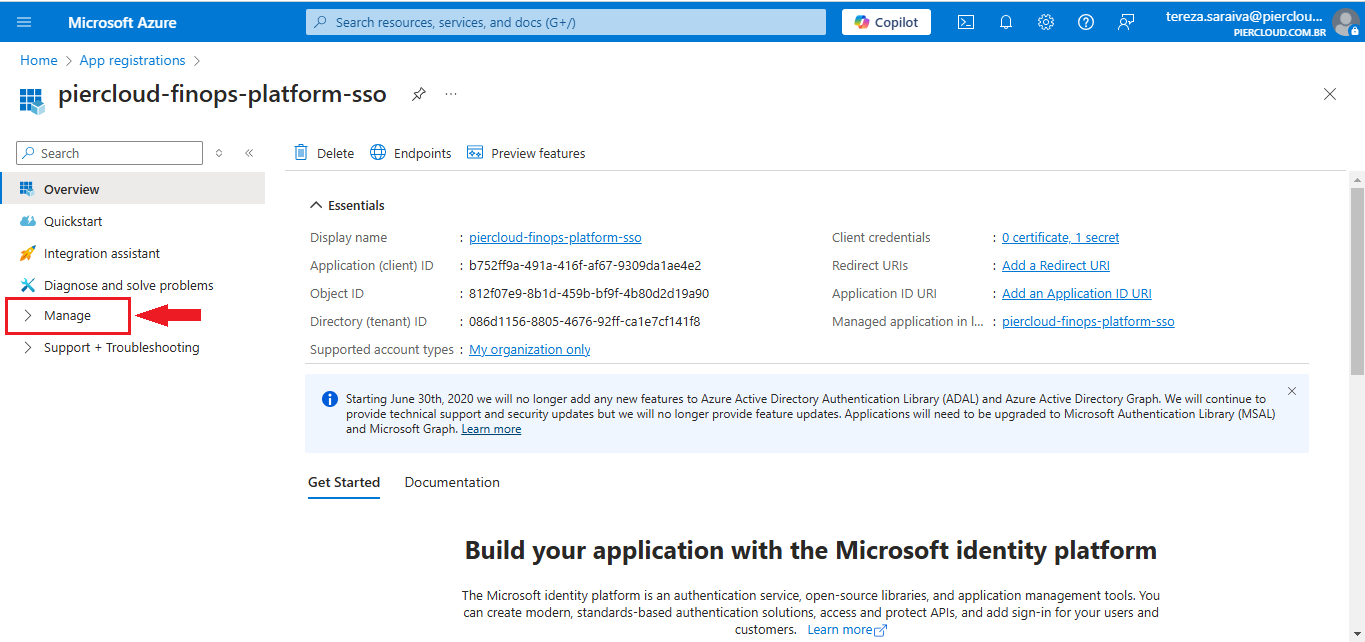
11. In this step, click on **Manage**, as illustrated in the image below.

<figure><img src="https://1687673077-files.gitbook.io/~/files/v0/b/gitbook-x-prod.appspot.com/o/spaces%2FZ9sinLUl52lDK1vg6b8g%2Fuploads%2FCghDXw9hZxLl8tMSyNU0%2Fimage.png?alt=media&#x26;token=775bec66-76ee-4559-8ed5-c27454b07d1f" alt=""><figcaption></figcaption></figure>

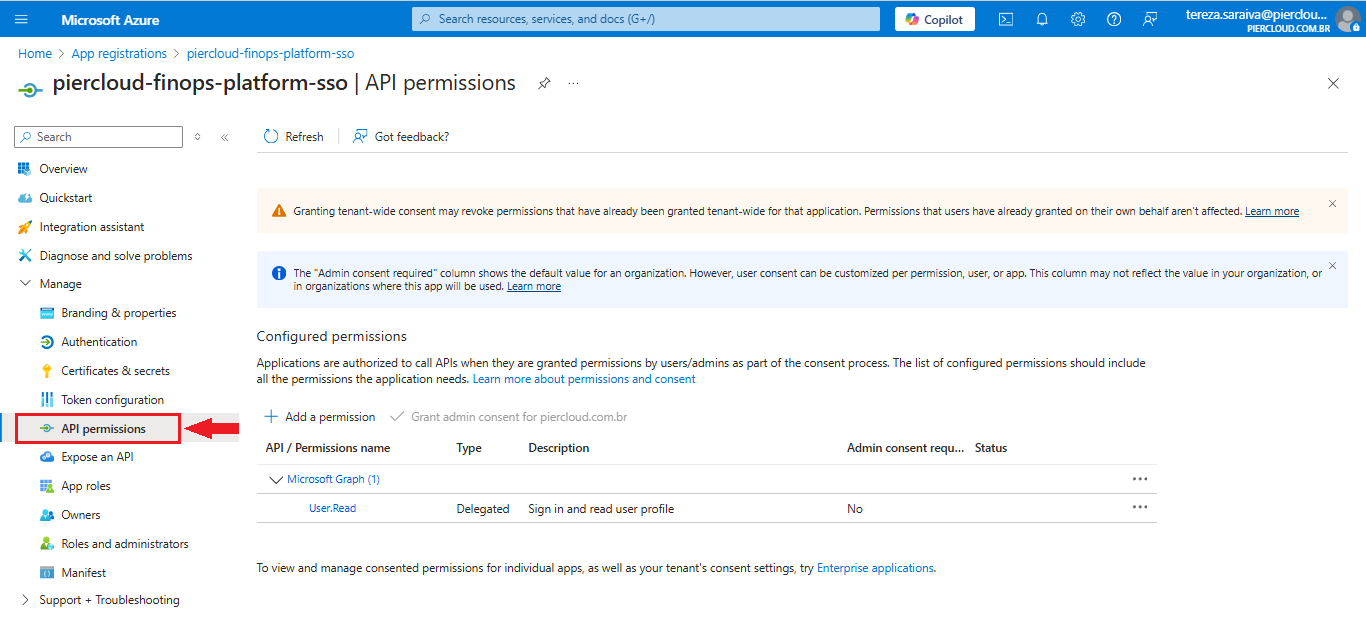
12. Here click on **API permissions**.

<figure><img src="https://1687673077-files.gitbook.io/~/files/v0/b/gitbook-x-prod.appspot.com/o/spaces%2FZ9sinLUl52lDK1vg6b8g%2Fuploads%2FQ7l4dqdbnpTGf0TMwp7P%2Fimage.png?alt=media&#x26;token=d902f991-3214-4d73-8f3a-89aba588e7d1" alt=""><figcaption></figcaption></figure>

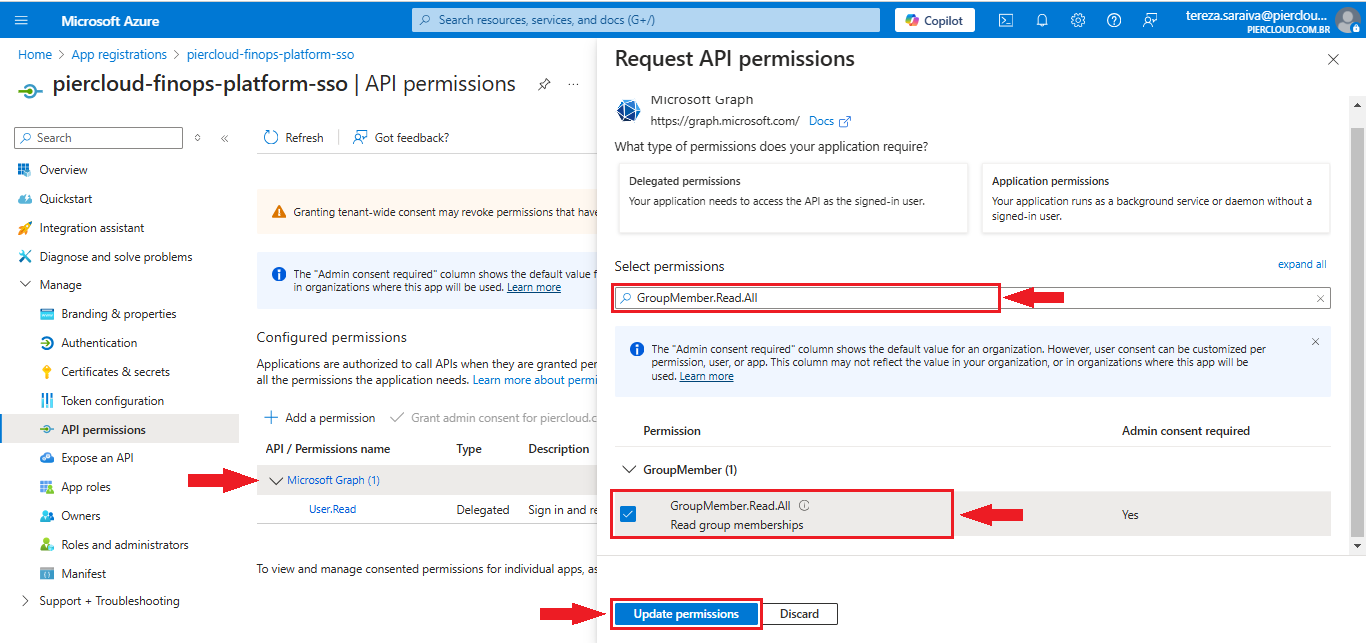
13. In this step, click on **Microsoft Graph** and a window will appear on the right. In the "Select permissions" field, look for **GroupMember.Read.All**. Then click on Update permissions, as shown in the image below:

**Be careful when selecting, as there are permissions with similar names. Make sure you choose the correct permission**

<figure><img src="https://1687673077-files.gitbook.io/~/files/v0/b/gitbook-x-prod.appspot.com/o/spaces%2FZ9sinLUl52lDK1vg6b8g%2Fuploads%2Fyiy0Ekl8EroG3ekiuq2v%2Fimage.png?alt=media&#x26;token=2b3ec810-8bc4-464c-9437-60c68a1818d4" alt=""><figcaption></figcaption></figure>

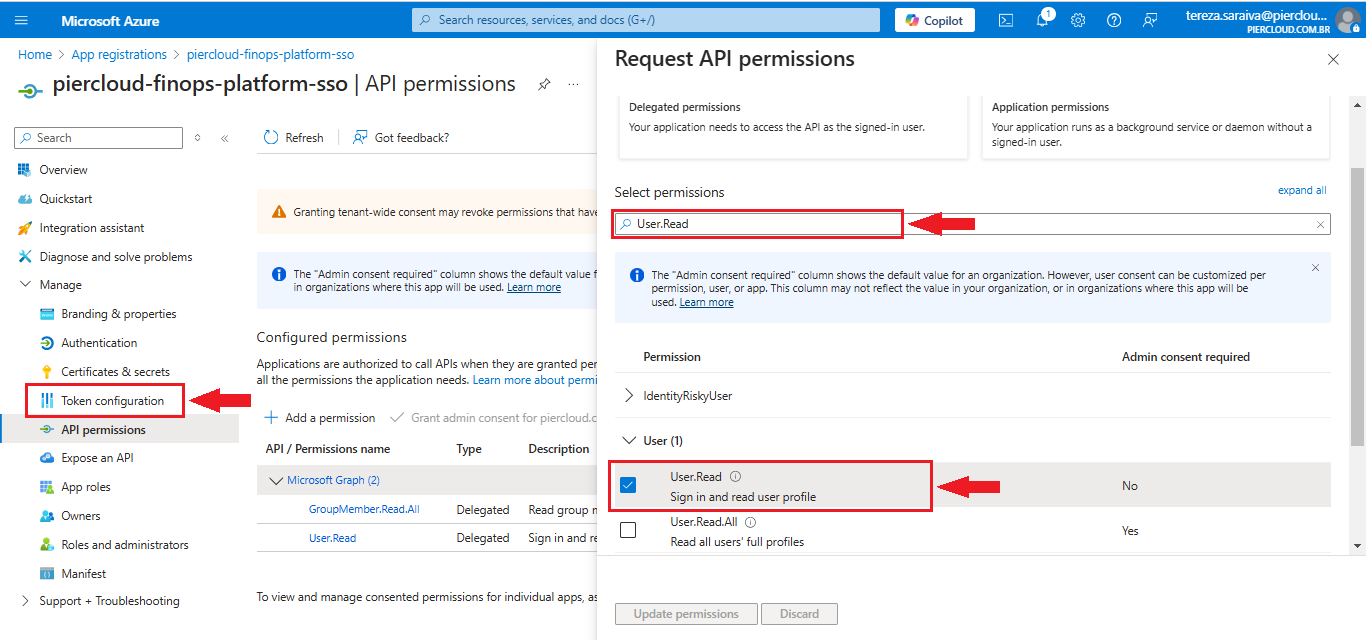
14. In the same window as the previous step, in the "**Select permissions**" field, look for **User.Read**, as illustrated in the image below. Make sure you select the correct permission, as there are similar options. After this process, in the bottom left menu, click on **Token configuration**.

<figure><img src="https://1687673077-files.gitbook.io/~/files/v0/b/gitbook-x-prod.appspot.com/o/spaces%2FZ9sinLUl52lDK1vg6b8g%2Fuploads%2FJkivT7X5qGKqZTwaD8WA%2Fimage.png?alt=media&#x26;token=f1fff825-a2fa-4189-8eb8-d62afdf52811" alt=""><figcaption></figcaption></figure>

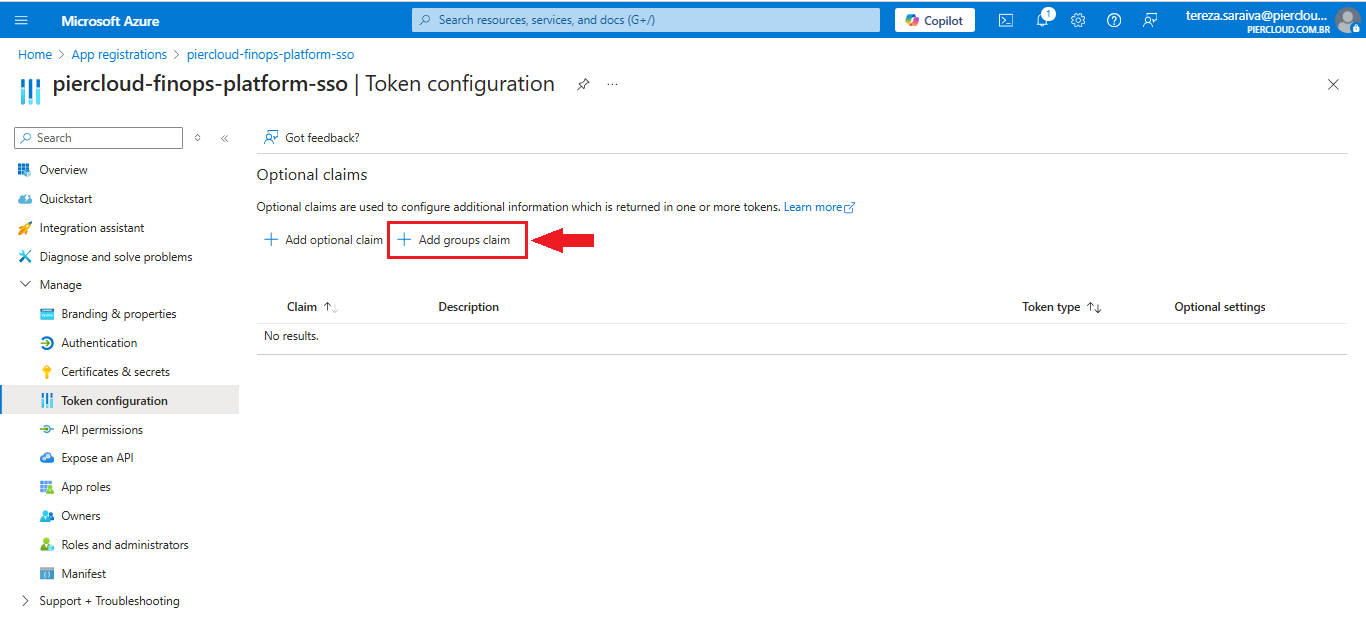
15. Here click on **+ ADD groups** **claim**, as illustrated in the image below.

<figure><img src="https://1687673077-files.gitbook.io/~/files/v0/b/gitbook-x-prod.appspot.com/o/spaces%2FZ9sinLUl52lDK1vg6b8g%2Fuploads%2FOSxFLNyWltzEtXq3I6kS%2Fimage.png?alt=media&#x26;token=f19255f1-833d-4107-b4e6-8d9c584b6a2a" alt=""><figcaption></figcaption></figure>

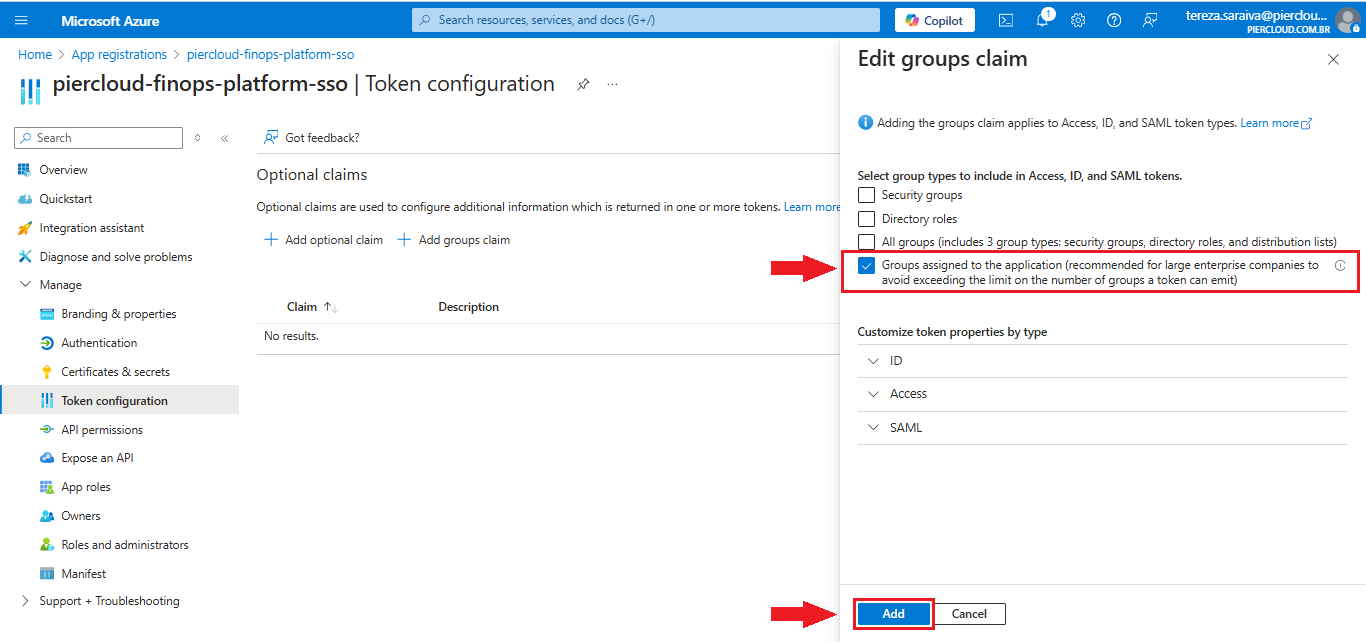
16. Click the "**Groups assigned to the application (recommended for large enterprise companies to avoid exceeding the limit on the number of groups a token can emit)**" checkbox, then click **Add**, as shown in the image below.

    **Note**: When you select this option, the groups that are in the organization's enterprise agreement will be selected.

<figure><img src="https://1687673077-files.gitbook.io/~/files/v0/b/gitbook-x-prod.appspot.com/o/spaces%2FZ9sinLUl52lDK1vg6b8g%2Fuploads%2FfHMZNNNmvWMkJv2GrBBK%2Fimage.png?alt=media&#x26;token=d7e3a006-dea1-4a17-a590-51b68fa6b7ab" alt=""><figcaption></figcaption></figure>

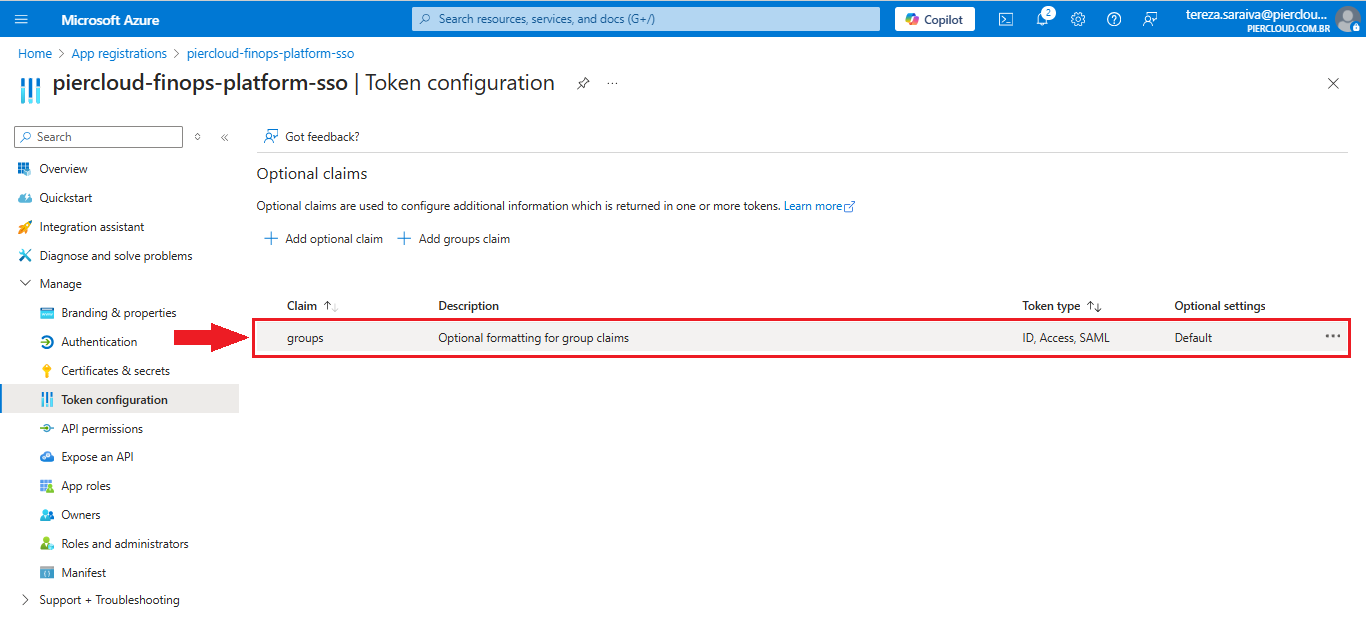
17. Token configuration, created successfully! As illustrated in the image below.

<figure><img src="https://1687673077-files.gitbook.io/~/files/v0/b/gitbook-x-prod.appspot.com/o/spaces%2FZ9sinLUl52lDK1vg6b8g%2Fuploads%2FLM2r8xDDejlk4JxzG4sg%2Fimage.png?alt=media&#x26;token=b148cff2-f82c-4b67-86e0-7458dce8475d" alt=""><figcaption></figcaption></figure>

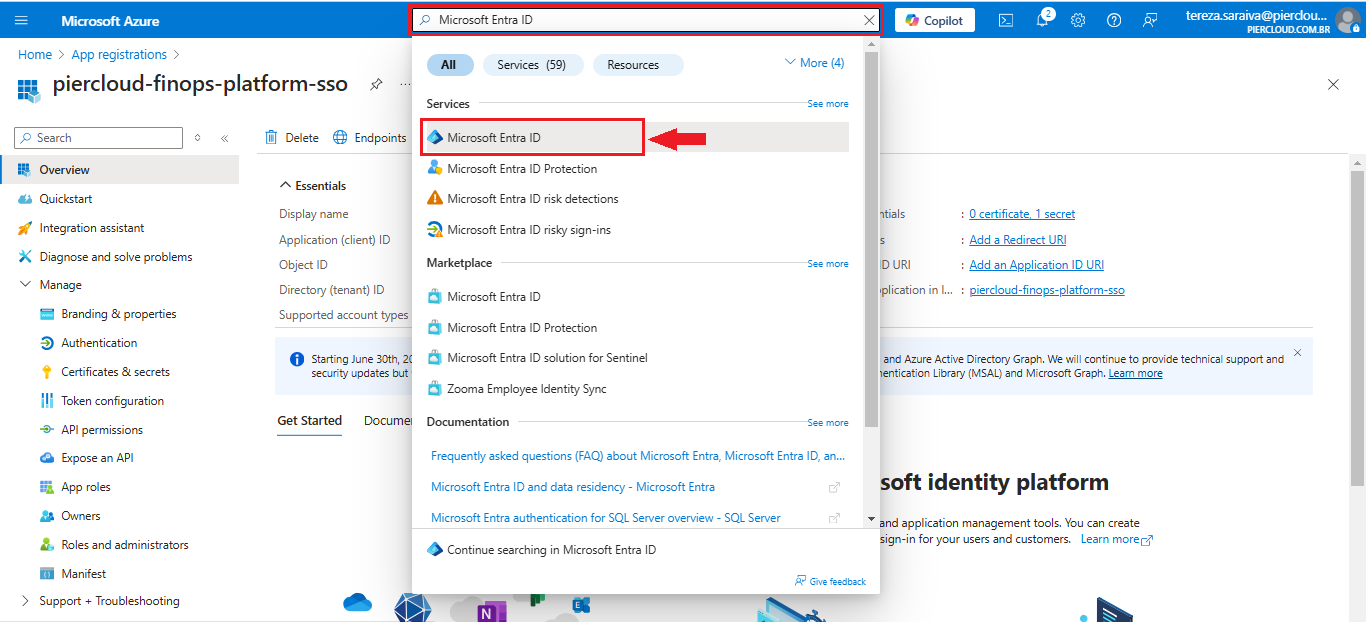
18. We need to add the AD groups to the created application (**piercloud-finops-platform-sso**). To do this, use the search bar to find **Microsoft Entra ID**. When you find it, click on the name that was searched, as illustrated in the image below.

<figure><img src="https://1687673077-files.gitbook.io/~/files/v0/b/gitbook-x-prod.appspot.com/o/spaces%2FZ9sinLUl52lDK1vg6b8g%2Fuploads%2FTf4DI1IHJlUININY8Hzd%2Fimage.png?alt=media&#x26;token=156a8e57-0436-42ca-bcbd-23c9ca4ef743" alt=""><figcaption></figcaption></figure>

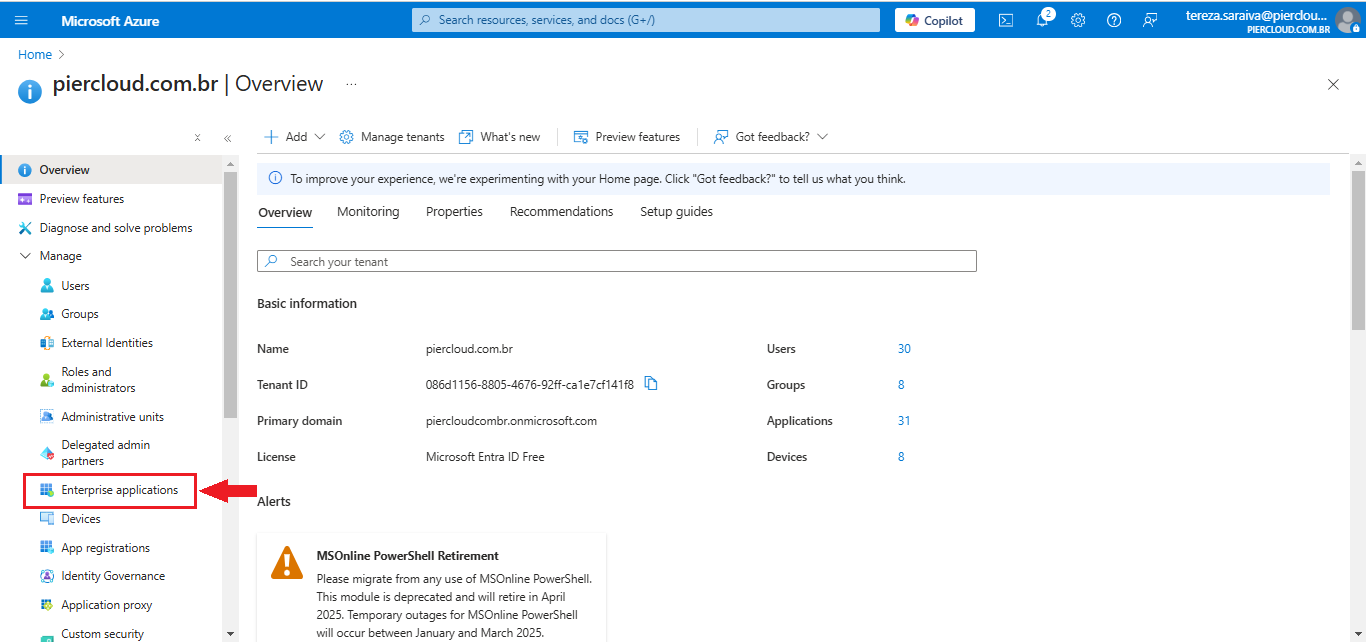
19. Here click on **Enterprise Applications**, in the bottom left menu, as illustrated in the image below

<figure><img src="https://1687673077-files.gitbook.io/~/files/v0/b/gitbook-x-prod.appspot.com/o/spaces%2FZ9sinLUl52lDK1vg6b8g%2Fuploads%2FCfHBF4VGUybLEpy16DAb%2Fimage.png?alt=media&#x26;token=20e603aa-067a-4151-bb08-aac37f554734" alt=""><figcaption></figcaption></figure>

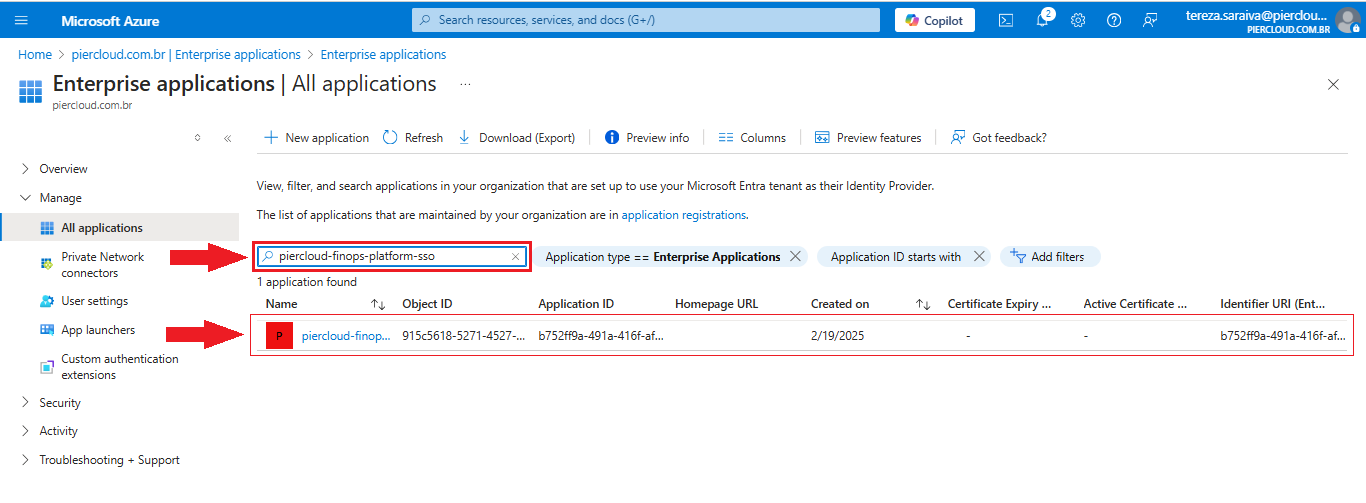
20. In this step, use the search field again to locate the application you created (in this case, **piercloud-finops-platform-sso**). Once you have found the desired application, click on its name, as illustrated in the image below.

<figure><img src="https://1687673077-files.gitbook.io/~/files/v0/b/gitbook-x-prod.appspot.com/o/spaces%2FZ9sinLUl52lDK1vg6b8g%2Fuploads%2FdaKwNPVrwLxLdLuFclzG%2Fimage.png?alt=media&#x26;token=2c19708a-2448-4dfa-93c9-1f939d26077b" alt=""><figcaption></figcaption></figure>

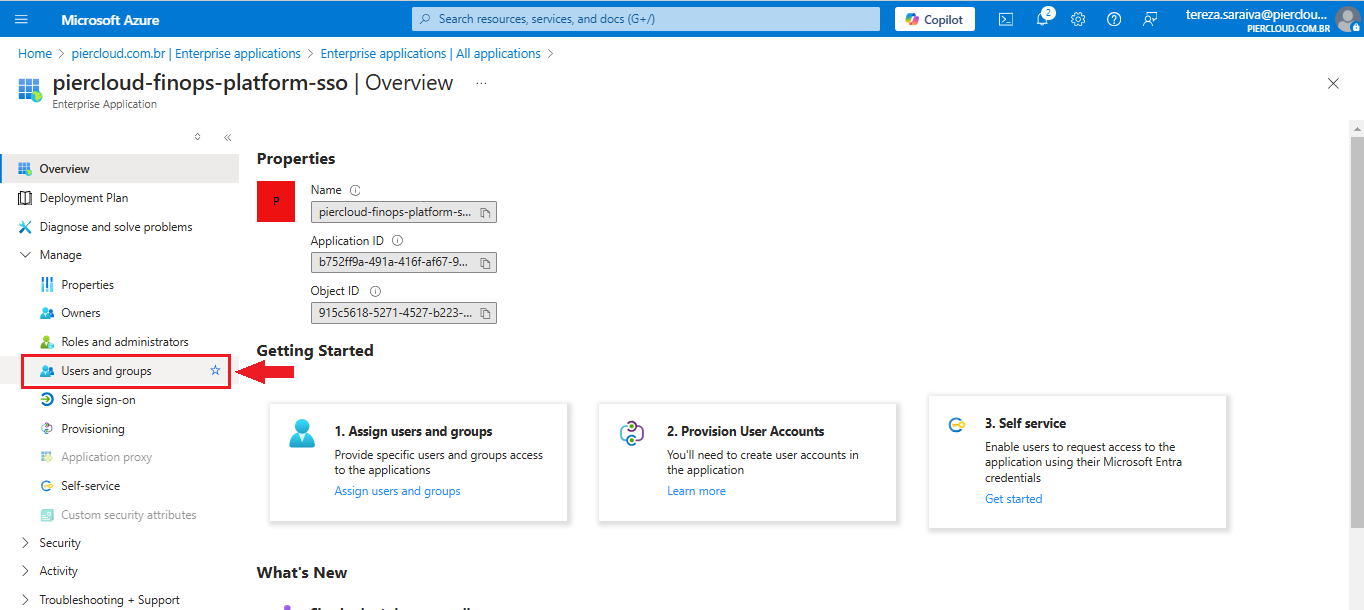
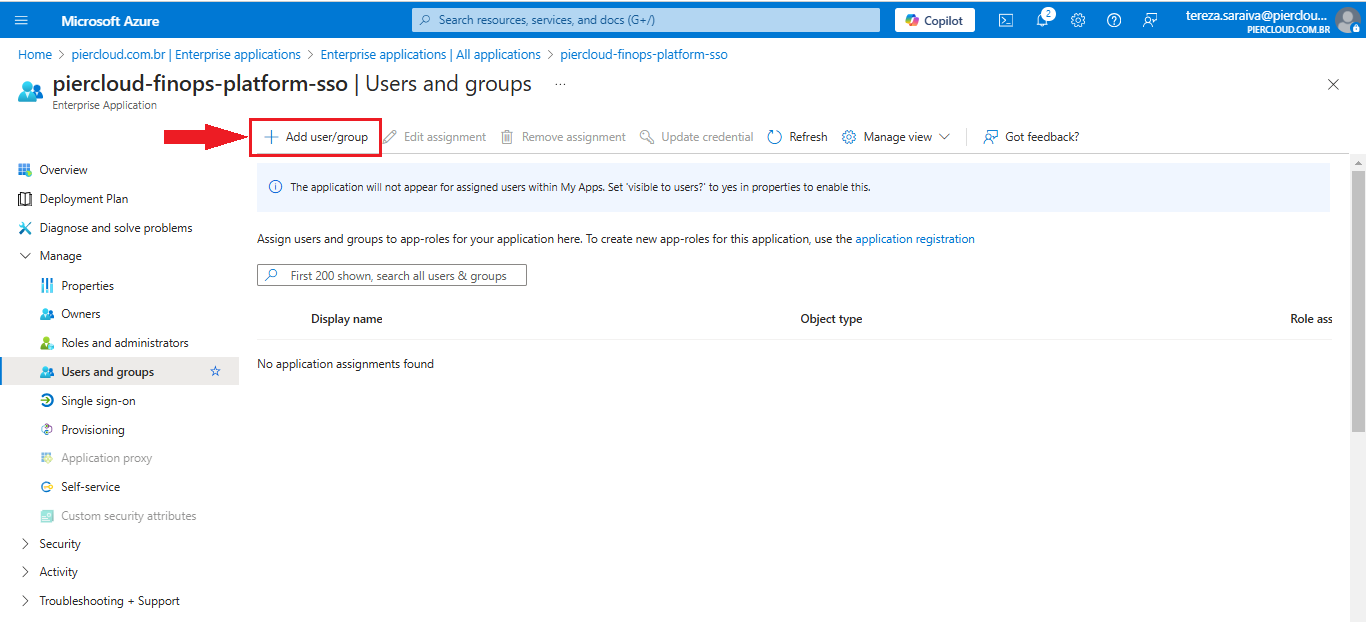
21. Here click on **User and groups**, in the bottom left menu, as illustrated in the image below.

<figure><img src="https://1687673077-files.gitbook.io/~/files/v0/b/gitbook-x-prod.appspot.com/o/spaces%2FZ9sinLUl52lDK1vg6b8g%2Fuploads%2Fddz2VsETqgP0F3XURQJ7%2Fimage.png?alt=media&#x26;token=244155c6-75da-477b-bec1-4fa2185095a6" alt=""><figcaption></figcaption></figure>

22. Click on **+ Add user/group** to select the groups that will have access to the application, as shown in the image below.

To access the Azure documentation click [here](https://learn.microsoft.com/en-us/entra/identity/enterprise-apps/assign-user-or-group-access-portal?pivots=portal)!

<figure><img src="https://1687673077-files.gitbook.io/~/files/v0/b/gitbook-x-prod.appspot.com/o/spaces%2FZ9sinLUl52lDK1vg6b8g%2Fuploads%2F4QS6tB2UdtiRGumFtC47%2Fimage.png?alt=media&#x26;token=fe761775-bbe6-41ad-a395-3b27034fdfe8" alt=""><figcaption></figcaption></figure>

23. That's it, the setup is complete. Below is a summary of the information you need to send to Pier Cloud..
    * Secret Value
    * Secret ID
    * Application (Client) ID
    * Directory (Tenant) ID

\
That's it, the configuration for single sign on using Azure Active Directory has been completed successfully.
