# FOCUS for AWS

## Focus Configuration Process for AWS Provider

#### Welcome to Pier Cloud!

Pier Cloud is our centralized platform for managing cloud data and services. Our focus is to ensure that access to resources is secure, convenient, and efficient. This document is designed to guide you through configuring Focus on the AWS provider.

Below, you will find a detailed process that explains each step clearly and objectively.

### In the AWS environment

1. In the AWS console, in the search field, look for **Cost and Usage Reports**, then select as illustrated in the image below.

<figure><img src="https://1687673077-files.gitbook.io/~/files/v0/b/gitbook-x-prod.appspot.com/o/spaces%2FZ9sinLUl52lDK1vg6b8g%2Fuploads%2F9pRABrCQR8sa0KoLo5bV%2Fimage.png?alt=media&#x26;token=1b4350fd-9c26-4be6-b4bd-30d1a5e43388" alt=""><figcaption></figcaption></figure>

2. Here select the **Data Exports** option, in the menu in the lower left corner, as illustrated in the image below.

<figure><img src="https://1687673077-files.gitbook.io/~/files/v0/b/gitbook-x-prod.appspot.com/o/spaces%2FZ9sinLUl52lDK1vg6b8g%2Fuploads%2FIDoyA8ALcCP9K5ccUMck%2Fimage.png?alt=media&#x26;token=feef41df-e03e-4ff2-8fc4-f279adcc77cf" alt=""><figcaption></figcaption></figure>

3. In this step, click on **Create**, as illustrated in the image below.

<figure><img src="https://1687673077-files.gitbook.io/~/files/v0/b/gitbook-x-prod.appspot.com/o/spaces%2FZ9sinLUl52lDK1vg6b8g%2Fuploads%2F2Em3KQcC1tUrpdPbJtfK%2Fimage.png?alt=media&#x26;token=3b3c1521-3ca4-4d48-89d6-426c77f30cb4" alt=""><figcaption></figcaption></figure>

4. In the **Export type** option, keep the default selected (**Standard data export**). In the **Export name** field, enter the name to identify the export. In **Data table content settings**, select the **FOCUS 1.0 with AWS columns - preview** option, as shown in the image below.

<figure><img src="https://1687673077-files.gitbook.io/~/files/v0/b/gitbook-x-prod.appspot.com/o/spaces%2FZ9sinLUl52lDK1vg6b8g%2Fuploads%2FTsVW8cQpaaWPf4xaQbPl%2Fimage.png?alt=media&#x26;token=467b64a6-9352-4a37-a874-c98b9f647e81" alt=""><figcaption></figcaption></figure>

4.1. In this step, keep the default settings under **Data export delivery options**. Under **Compression type and file format**, select **Parquet - Parquet**. In the **File version** field, choose the **Overwrite existing data export file** option, as illustrated in the image below.

<figure><img src="https://1687673077-files.gitbook.io/~/files/v0/b/gitbook-x-prod.appspot.com/o/spaces%2FZ9sinLUl52lDK1vg6b8g%2Fuploads%2Fsr40uc7RVLRBV3ImcUd7%2Fimage.png?alt=media&#x26;token=8ef3fe77-0ec7-4c47-a77f-36d79cdb18d1" alt=""><figcaption></figcaption></figure>

4.2. Here click on **Configure**, as illustrated in the image below.

<figure><img src="https://1687673077-files.gitbook.io/~/files/v0/b/gitbook-x-prod.appspot.com/o/spaces%2FZ9sinLUl52lDK1vg6b8g%2Fuploads%2Fzvkr5yQoOQtqsT3BsLmP%2Fimage.png?alt=media&#x26;token=91546e9e-2f06-4ba7-93ff-f2478d203318" alt=""><figcaption></figcaption></figure>

4.3.  Here you will have two options: **Create a bucket** and **Select existing bucket**. In this scenario, we will use the same bucket in which the customer's **Billing (CUR)** was configured.

**Note**: If the customer prefers to use another bucket, it will be necessary to change the **role** permissions to ensure that **Focus** has access to the account and can extract the billing data.

After choosing the **Select existing bucket** option, in the **S3 bucket name** field, search for the name of the existing bucket (in this case, we are using **pier-raw-focus** for testing). After finding the desired bucket, select it. Then, check the **I agree to overwrite my S3 bucket policy** checkbox and click **Select bucket**, as shown in the image below.

<figure><img src="https://1687673077-files.gitbook.io/~/files/v0/b/gitbook-x-prod.appspot.com/o/spaces%2FZ9sinLUl52lDK1vg6b8g%2Fuploads%2F7h0onZGwNwc4v9NRqcGU%2Fimage.png?alt=media&#x26;token=8f88f3c3-9542-4e2d-a0a4-4fa0eaaabe37" alt="" width="417"><figcaption></figcaption></figure>

4.4. Bucket successfully configured! Now add a name in the **S3 path prefix** field (In this case we used the name Focus-AWS-test, but it is a fictitious name), to identify it, then click **Create**, as illustrated in the image below.

<figure><img src="https://1687673077-files.gitbook.io/~/files/v0/b/gitbook-x-prod.appspot.com/o/spaces%2FZ9sinLUl52lDK1vg6b8g%2Fuploads%2FuncJybQAMmjhICPMLnHZ%2Fimage.png?alt=media&#x26;token=f3e72281-696f-40ee-8f9e-e2128e9eb038" alt=""><figcaption></figcaption></figure>

5. Export to Focus, created successfully! Just wait for the export to sync, this happens after 24 hours

<figure><img src="https://1687673077-files.gitbook.io/~/files/v0/b/gitbook-x-prod.appspot.com/o/spaces%2FZ9sinLUl52lDK1vg6b8g%2Fuploads%2FnpfhXAH5MxfpSoymrTCR%2Fimage.png?alt=media&#x26;token=b4ce54b4-531b-4e41-b32b-cc45e91c5e9a" alt=""><figcaption></figcaption></figure>

6. In this step, we will show you how to get the path of the created bucket.
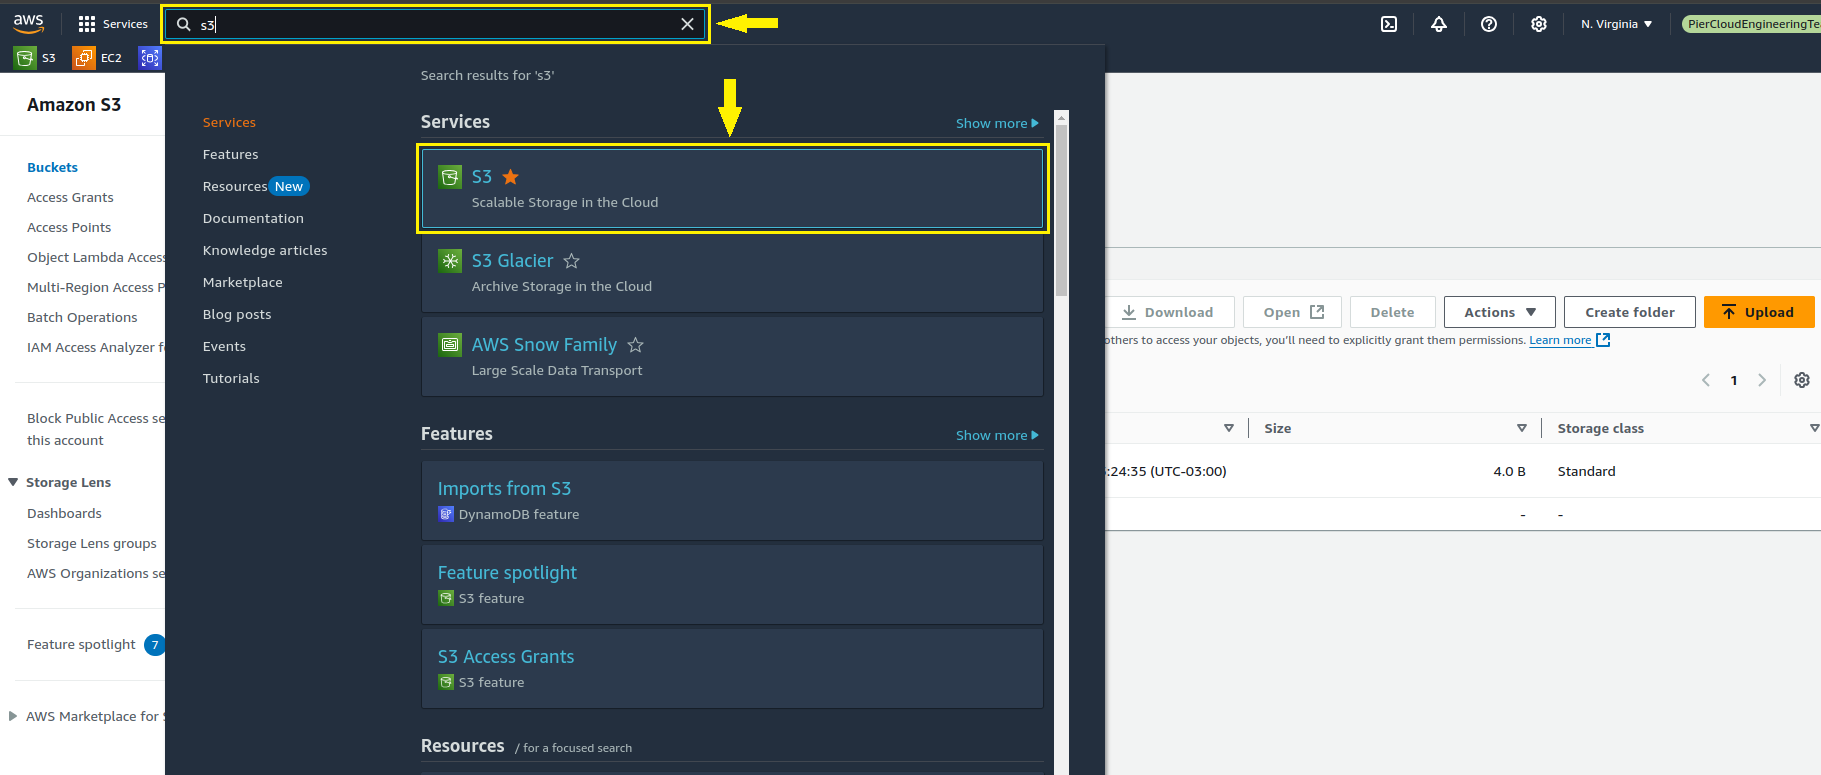
   1. Access the **AWS console**.
   2. Click on **Services**.
   3. In the search field, look for **S3**.

<figure><img src="https://1687673077-files.gitbook.io/~/files/v0/b/gitbook-x-prod.appspot.com/o/spaces%2FZ9sinLUl52lDK1vg6b8g%2Fuploads%2FvxtrNV8eAQQPooyjWYdB%2Fimage.png?alt=media&#x26;token=c5493753-7a16-49d9-ae5f-270707ca9952" alt=""><figcaption></figcaption></figure>

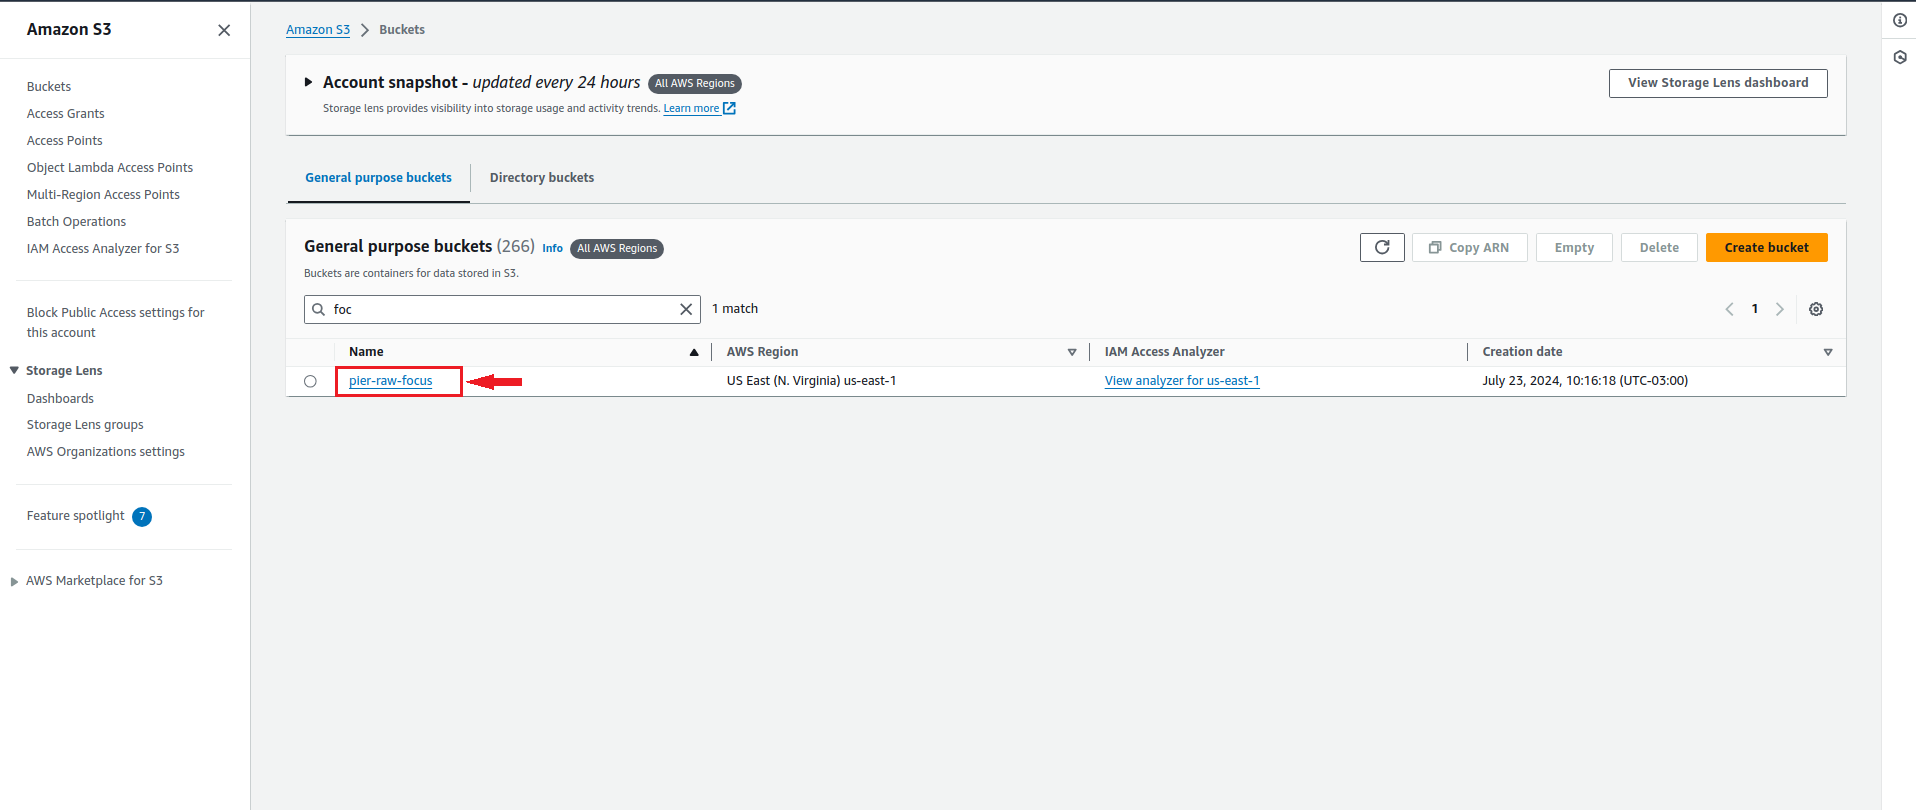
6.1. In the search field, look for the bucket you created during billing setup.

**Note**: If the customer created a specific bucket for Focus and configured that bucket in the Focus export, that will be the name you should search for (in this example, we will use "pier-raw-focus"). Once you find the bucket you are looking for, click on the corresponding name.

<figure><img src="https://1687673077-files.gitbook.io/~/files/v0/b/gitbook-x-prod.appspot.com/o/spaces%2FZ9sinLUl52lDK1vg6b8g%2Fuploads%2FwHxJXjQHjSs8xJ5TmCvv%2Fimage.png?alt=media&#x26;token=0c2a447b-9594-4080-b784-b805349bb811" alt=""><figcaption></figcaption></figure>

6.2. Here click on the focus export directory as illustrated in the image below.

<figure><img src="https://1687673077-files.gitbook.io/~/files/v0/b/gitbook-x-prod.appspot.com/o/spaces%2FZ9sinLUl52lDK1vg6b8g%2Fuploads%2FCNRK2646px2K5ZVM6RKu%2Fimage.png?alt=media&#x26;token=5cd71bc0-94ca-4955-8750-8713f8334ea1" alt=""><figcaption></figcaption></figure>

6.3. Here click on the **focus-test** directory as illustrated in the image below.

<figure><img src="https://1687673077-files.gitbook.io/~/files/v0/b/gitbook-x-prod.appspot.com/o/spaces%2FZ9sinLUl52lDK1vg6b8g%2Fuploads%2FXwYV3iAWqEOywsFoNYXu%2Fimage.png?alt=media&#x26;token=493f18bf-6d24-4a04-810e-e2e0ae599704" alt=""><figcaption></figcaption></figure>

6.4. Here click on the **data** directory, as illustrated in the image below:

<figure><img src="https://1687673077-files.gitbook.io/~/files/v0/b/gitbook-x-prod.appspot.com/o/spaces%2FZ9sinLUl52lDK1vg6b8g%2Fuploads%2FAz6gajSIA8eAbqGiA7Kj%2Fimage.png?alt=media&#x26;token=167b6140-63b2-4545-a34c-d33b2e9ec69d" alt=""><figcaption></figcaption></figure>

6.5. **Ready**, here is the S3 path to configure on the Platform.

* **Note**: Note the path address (**pier-raw-focus/focus-billing/focus-teste/data/**) as shown in the image below.

<figure><img src="https://1687673077-files.gitbook.io/~/files/v0/b/gitbook-x-prod.appspot.com/o/spaces%2FZ9sinLUl52lDK1vg6b8g%2Fuploads%2FaWJKBuzJyjRUphl5dr21%2Fimage.png?alt=media&#x26;token=28773c48-e10d-44e0-ba46-93597bc2b9b2" alt=""><figcaption></figcaption></figure>

### On the Pier Cloud Platform

1. On the Platform home page, click on your user icon and then select **Settings** as shown in the image below.

<figure><img src="https://1687673077-files.gitbook.io/~/files/v0/b/gitbook-x-prod.appspot.com/o/spaces%2FZ9sinLUl52lDK1vg6b8g%2Fuploads%2F7ssMsdeUMRTJqbevQ2nn%2Fimage.png?alt=media&#x26;token=9803d028-a082-4a69-b628-041fd809c3b4" alt=""><figcaption></figcaption></figure>

2. In the left menu, select **Billing Connectors**.

<figure><img src="https://1687673077-files.gitbook.io/~/files/v0/b/gitbook-x-prod.appspot.com/o/spaces%2FZ9sinLUl52lDK1vg6b8g%2Fuploads%2FcbTMJJxwr6B7DHRe2enI%2Fimage.png?alt=media&#x26;token=312638f0-8c92-4924-a51c-b476f97ec9ec" alt=""><figcaption></figcaption></figure>

3. In this step, click on **+ Add** **Connector** in the top right menu as shown in the image below.

<figure><img src="https://1687673077-files.gitbook.io/~/files/v0/b/gitbook-x-prod.appspot.com/o/spaces%2FZ9sinLUl52lDK1vg6b8g%2Fuploads%2FkaBhyzijR6tpzNWN8EYJ%2Fimage.png?alt=media&#x26;token=f1210890-2460-46d1-a48e-659d428f8c90" alt=""><figcaption></figcaption></figure>

4. At this step, in the **Type** field, select the **FOCUS** option, as illustrated in the image below.

<figure><img src="https://1687673077-files.gitbook.io/~/files/v0/b/gitbook-x-prod.appspot.com/o/spaces%2FZ9sinLUl52lDK1vg6b8g%2Fuploads%2FNZnD84cSBQYJTkZmNapT%2Fimage.png?alt=media&#x26;token=66b01949-4776-4b4a-be2b-8284e61be652" alt=""><figcaption></figcaption></figure>

4.1. In this step, follow the instructions below to fill in the fields correctly:

* In the "**Billing Connector ID**" field, enter a name to identify the billing connector (in this example, we will use "AWS Pier FOCUS").
* In the "**AWS Account ID**" field, enter the ID of the account where billing was configured (export from Focus).
* In the "Name of the S3 Bucket that contains the Billing data information" field, enter the name of the bucket where billing was configured, or the name of the bucket created specifically for Focus, if the customer chose this option.
* In the "**Path that contains the billing data**" field, enter the S3 path where the billing data is stored (the path was obtained in step 18).
* In the "**File Type in the bucket**" field, select the type of file that is being stored in the bucket (in this case, we selected "Parquet").

Then, click **Save**, as illustrated in the image to the side.

<figure><img src="https://1687673077-files.gitbook.io/~/files/v0/b/gitbook-x-prod.appspot.com/o/spaces%2FZ9sinLUl52lDK1vg6b8g%2Fuploads%2FJxaLufTcT4AdSLodvmhz%2Fimage.png?alt=media&#x26;token=72745249-bdd5-4afd-a6e8-55354d56b859" alt=""><figcaption></figcaption></figure>

5. The Billing Connector for Focus has been successfully created!

**Note**: To view the created connector, click on the **FOCUS** tab, as shown in the image below.

<figure><img src="https://1687673077-files.gitbook.io/~/files/v0/b/gitbook-x-prod.appspot.com/o/spaces%2FZ9sinLUl52lDK1vg6b8g%2Fuploads%2FNooNz2CxPODDPUy5M57k%2Fimage.png?alt=media&#x26;token=56b9d4f3-d27e-4844-9599-b6ccab4aa74c" alt=""><figcaption></figcaption></figure>
