# FOCUS for Azure

## Focus Configuration Process for Azure Provider

#### Welcome to Pier Cloud!

Pier Cloud is our centralized platform for managing cloud data and services. Our focus is to ensure that access to resources is secure, convenient, and efficient. This document is designed to guide you through configuring Focus on the Azure provider.

Below, you will find a detailed process that explains each step clearly and objectively.

### In the Azure environment

1. To start the configuration, access the Azure portal and, in the search field, look for "**Microsoft Entra ID**". Once you have found it, click on the name you searched for, as illustrated in the image below.

<figure><img src="https://1687673077-files.gitbook.io/~/files/v0/b/gitbook-x-prod.appspot.com/o/spaces%2FZ9sinLUl52lDK1vg6b8g%2Fuploads%2F2vvR97AnDxImUxLeJivl%2Fimage.png?alt=media&#x26;token=83097adf-aad4-439d-a717-cfa180762bd9" alt=""><figcaption></figcaption></figure>

2. Here, select "**App registrations**" in the bottom left menu as shown in the image below.

**Note**: It is necessary to create a Service Principal to ensure that it has access to the container responsible for exporting the Billing Focus.

<figure><img src="https://1687673077-files.gitbook.io/~/files/v0/b/gitbook-x-prod.appspot.com/o/spaces%2FZ9sinLUl52lDK1vg6b8g%2Fuploads%2FjDZZoSGd8JNUYUXVEmBp%2Fimage.png?alt=media&#x26;token=7ce43661-bdf3-4d67-b26e-efa69e8ba2ce" alt=""><figcaption></figcaption></figure>

3. Here click on **+ New registration**, to create the Service Principal.

<figure><img src="https://1687673077-files.gitbook.io/~/files/v0/b/gitbook-x-prod.appspot.com/o/spaces%2FZ9sinLUl52lDK1vg6b8g%2Fuploads%2FH2vwJKYpvoPCkQgcqgSo%2Fimage.png?alt=media&#x26;token=df5f34a5-0aa0-40ea-8ae8-6df72326e98d" alt=""><figcaption></figcaption></figure>

4. In the **Name** field, enter the name that will be given to the **Service Principal** (App Registration). For this example, we will use the name “**focus-teste**”, but the customer can choose the name of their preference. In the **Supported account types** field, select the option **Accounts in any organization directory (Any Microsoft Entra ID tenant - Multitenant)**. Then, click **Register** to create the Service Principal, as illustrated in the image below.

<figure><img src="https://1687673077-files.gitbook.io/~/files/v0/b/gitbook-x-prod.appspot.com/o/spaces%2FZ9sinLUl52lDK1vg6b8g%2Fuploads%2FWIssNs1MFqhlr4sSMpnM%2Fimage.png?alt=media&#x26;token=c1d65a83-54e2-4138-88dc-1ee7e57566a4" alt=""><figcaption></figcaption></figure>

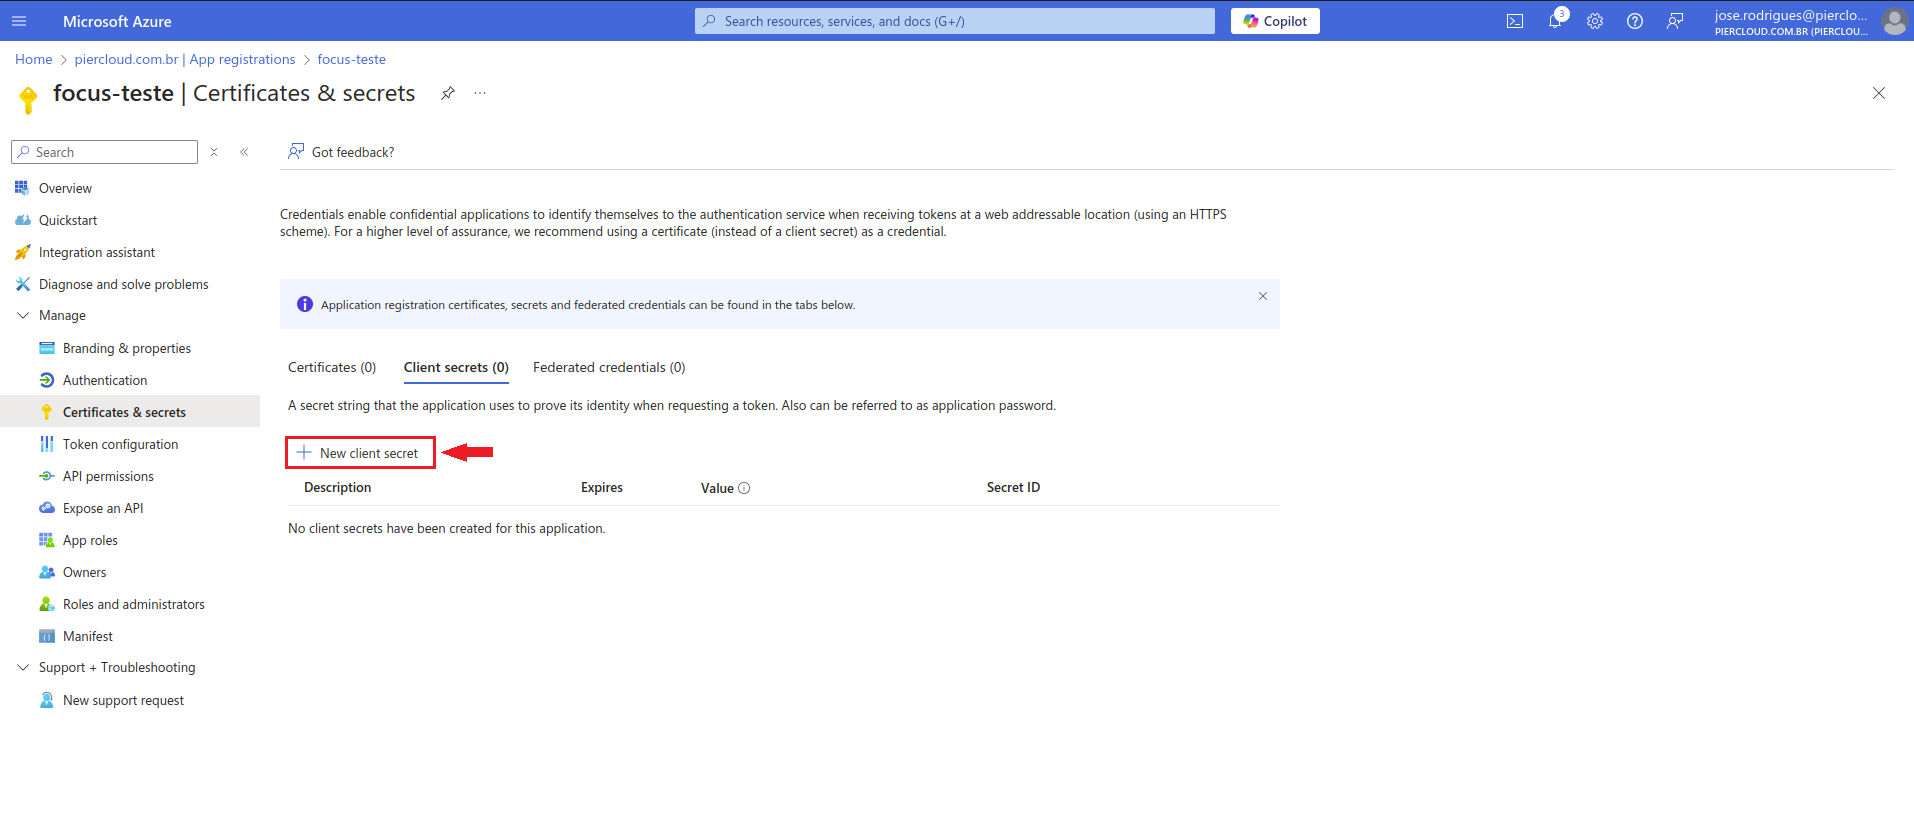
5. The Service Principal has been successfully created! Now let's create the Secret by clicking on **Add a certificate or secret**, as illustrated in the image below.

<figure><img src="https://1687673077-files.gitbook.io/~/files/v0/b/gitbook-x-prod.appspot.com/o/spaces%2FZ9sinLUl52lDK1vg6b8g%2Fuploads%2FXFBjDVrOkpa7m6pENOSn%2Fimage.png?alt=media&#x26;token=5691200b-0209-46aa-ac19-fc517ad2615a" alt=""><figcaption></figcaption></figure>

6. To start the configuration, access the Azure portal and, in the search field, look for "**App registrations**", after finding the name you searched for, click on the name.

<figure><img src="https://1687673077-files.gitbook.io/~/files/v0/b/gitbook-x-prod.appspot.com/o/spaces%2FZ9sinLUl52lDK1vg6b8g%2Fuploads%2F3szm4vE9WPdVrv4HJtSJ%2Fimage.png?alt=media&#x26;token=c8719abd-792a-405b-9c1f-8021782206df" alt=""><figcaption></figcaption></figure>

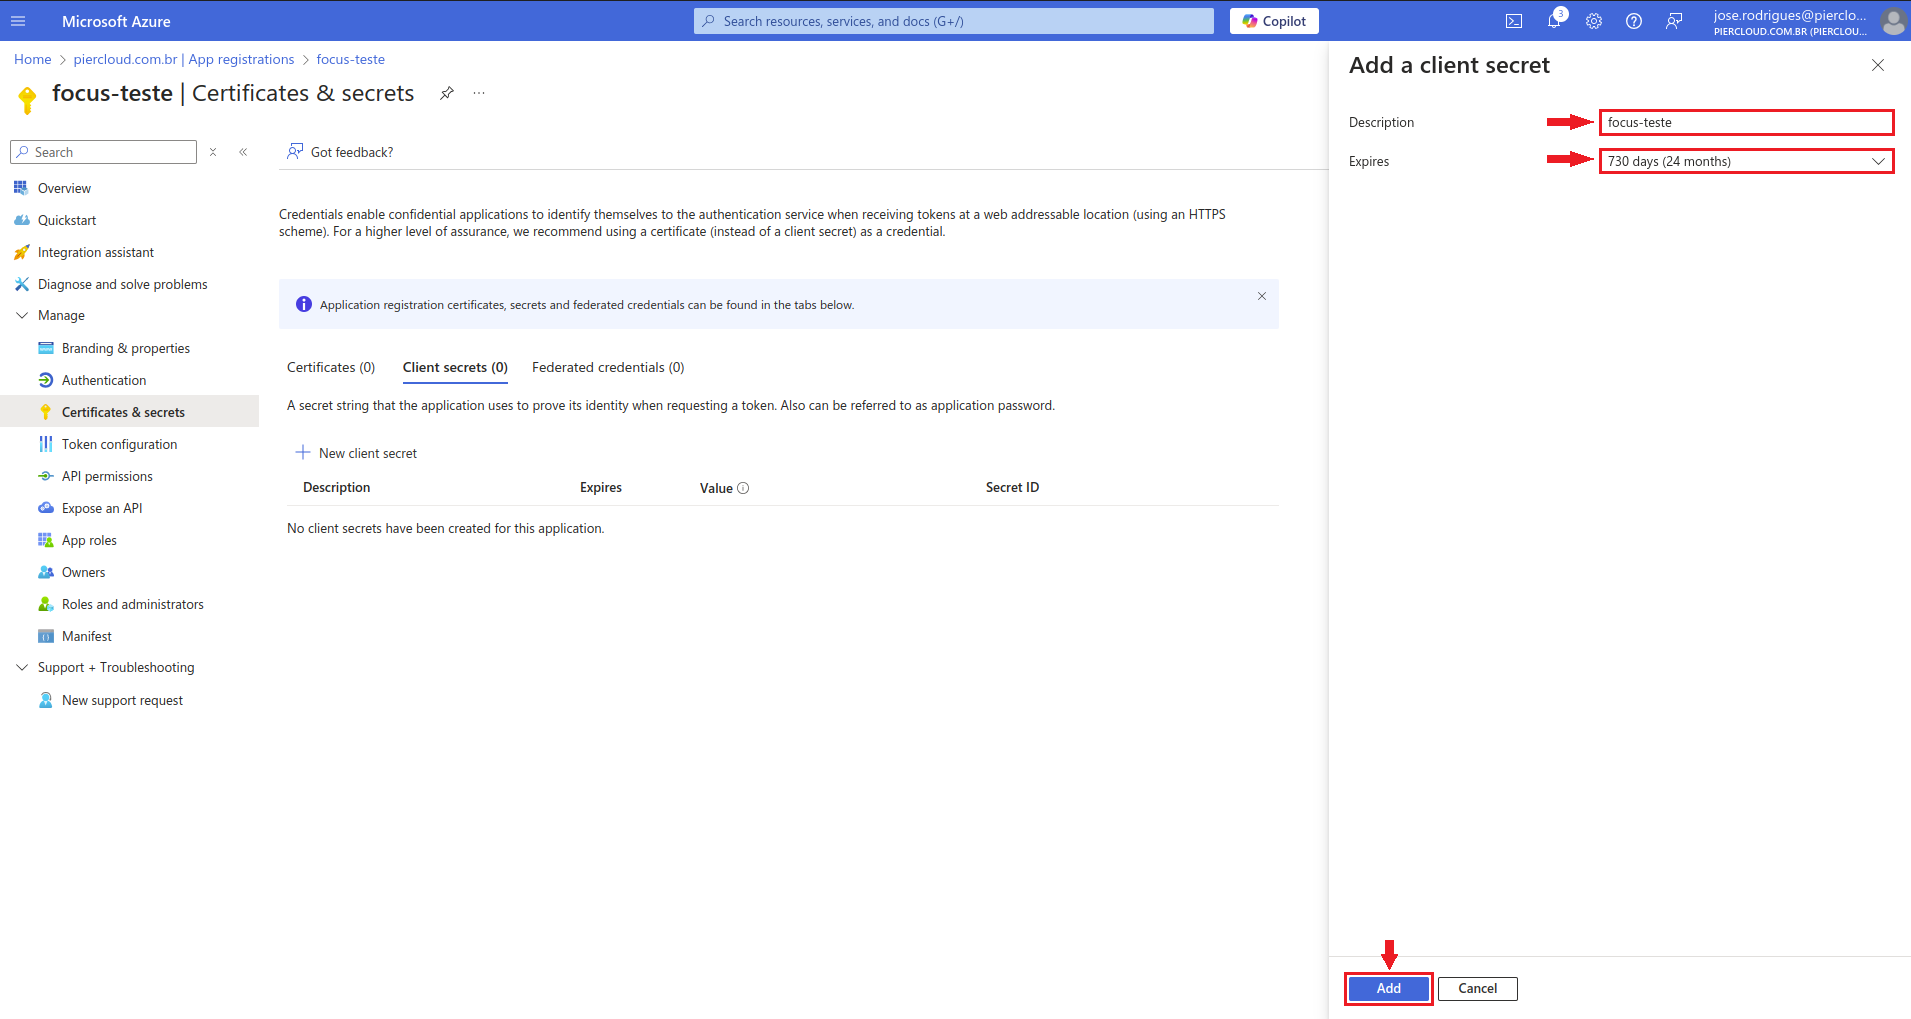
7. In the window on the right, in the **Description** field, add the name for the secret (in this case, "focus-teste"). In the **Expires** field, select the expiration period for the secret (we will set it to 730 days in this example). Finally, click **Add**, as illustrated in the image below.

<figure><img src="https://1687673077-files.gitbook.io/~/files/v0/b/gitbook-x-prod.appspot.com/o/spaces%2FZ9sinLUl52lDK1vg6b8g%2Fuploads%2Fe02jDoiaHJqRchqR6hQw%2Fimage.png?alt=media&#x26;token=b4508f66-5593-4145-a3f2-ce9b3172bfd7" alt=""><figcaption></figcaption></figure>

8. The Secret has been successfully created! Now copy the **Value** and **Secret ID**, save them in a notepad, and send them to the Pier Cloud team responsible for configuring the platform.

<figure><img src="https://1687673077-files.gitbook.io/~/files/v0/b/gitbook-x-prod.appspot.com/o/spaces%2FZ9sinLUl52lDK1vg6b8g%2Fuploads%2FYetngoy8FvbTAkj8FH1d%2Fimage.png?alt=media&#x26;token=293171f6-7aee-4bbd-9ec3-168de1d7c16c" alt=""><figcaption></figcaption></figure>

9. Service Principal (APP registration) and secret created successfully! Now we can move on to the next steps of the configuration.

<figure><img src="https://1687673077-files.gitbook.io/~/files/v0/b/gitbook-x-prod.appspot.com/o/spaces%2FZ9sinLUl52lDK1vg6b8g%2Fuploads%2FniPcJAEh4pWdbPrStzVb%2Fimage.png?alt=media&#x26;token=a2120f5b-5125-4542-a2c3-5ed9e3c47734" alt=""><figcaption></figcaption></figure>

10. To start the configuration, access the Azure portal and, in the search field, look for "Storage Accounts". Then, create a new storage account for **Focus Billing**.

<figure><img src="https://1687673077-files.gitbook.io/~/files/v0/b/gitbook-x-prod.appspot.com/o/spaces%2FZ9sinLUl52lDK1vg6b8g%2Fuploads%2FCp0k02Oh9lKq1oAVC9jt%2Fimage.png?alt=media&#x26;token=d390adc3-e896-4ac1-a6c1-4929db6d98d0" alt=""><figcaption></figcaption></figure>

11. Here click on **+ Create**, as shown in the image below:

<figure><img src="https://1687673077-files.gitbook.io/~/files/v0/b/gitbook-x-prod.appspot.com/o/spaces%2FZ9sinLUl52lDK1vg6b8g%2Fuploads%2FILfyfdW3Cj8e62TaaVkJ%2Fimage.png?alt=media&#x26;token=3c6db6c9-b8bf-4cdc-8687-0197643ad46b" alt=""><figcaption></figcaption></figure>

12. In this step, we will add the necessary information to create the Storage that will be used in the **Focus Billing** configuration, then click on **Review + create**.

**Note**: If you prefer to use existing storage, this is also possible without any problems.

<figure><img src="https://1687673077-files.gitbook.io/~/files/v0/b/gitbook-x-prod.appspot.com/o/spaces%2FZ9sinLUl52lDK1vg6b8g%2Fuploads%2FhLNY2qkT5k54aDX22nEa%2Fimage.png?alt=media&#x26;token=34a69aed-4e24-48b9-935c-3910573b02df" alt=""><figcaption></figcaption></figure>

13. Once the Storage has been created or an existing one has been used, we can continue with the configuration.

<figure><img src="https://1687673077-files.gitbook.io/~/files/v0/b/gitbook-x-prod.appspot.com/o/spaces%2FZ9sinLUl52lDK1vg6b8g%2Fuploads%2FZJnmN7LpgG8Plv35f4TK%2Fimage.png?alt=media&#x26;token=1286a911-a952-4ecd-8352-88e6a214c9e3" alt=""><figcaption></figcaption></figure>

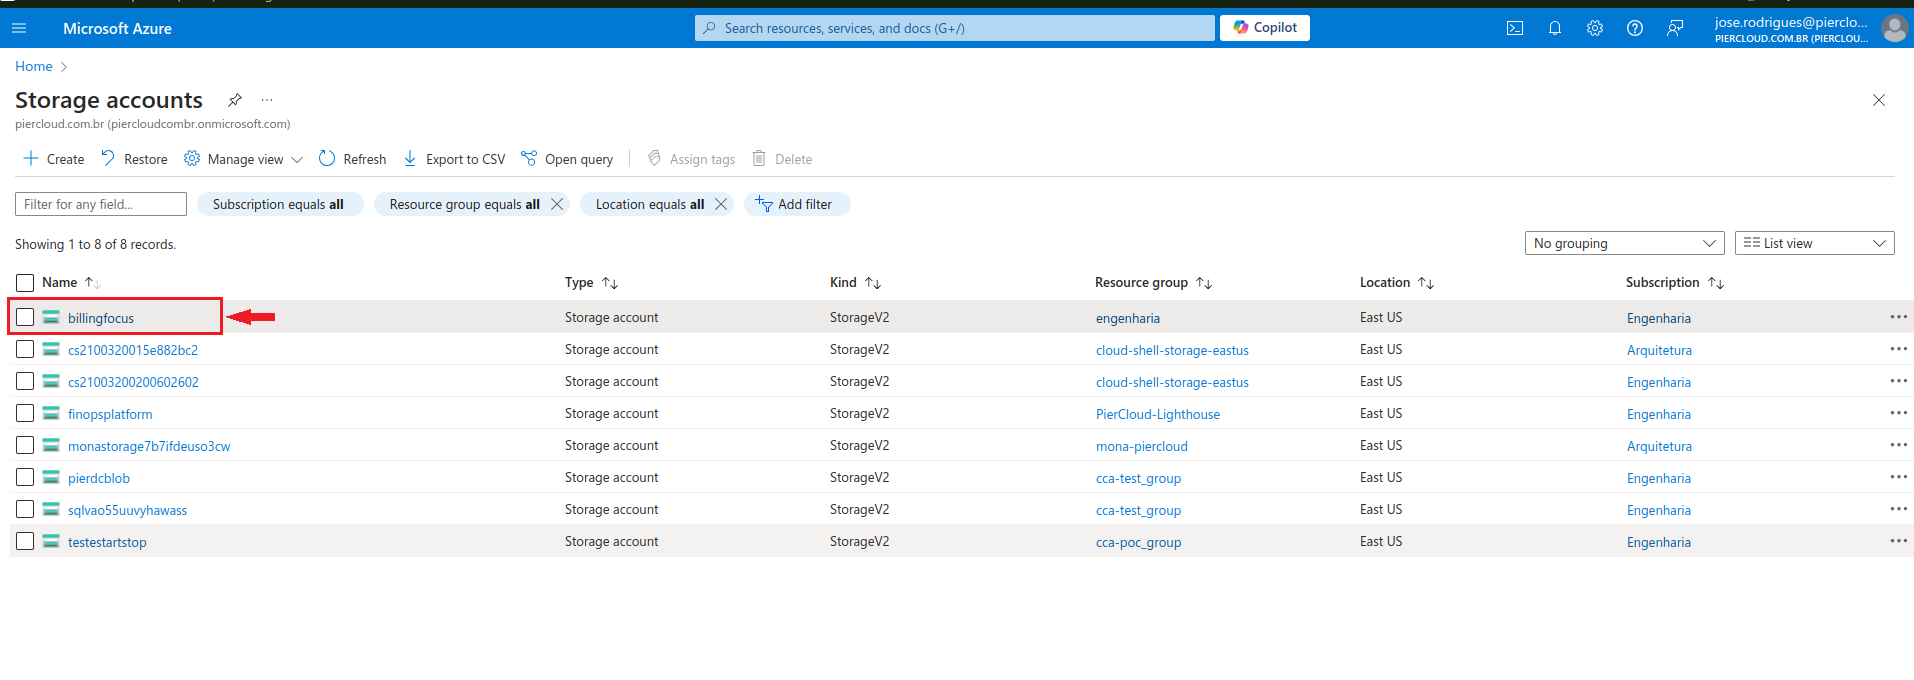
14. Click on the Storage that was created.

<figure><img src="https://1687673077-files.gitbook.io/~/files/v0/b/gitbook-x-prod.appspot.com/o/spaces%2FZ9sinLUl52lDK1vg6b8g%2Fuploads%2FijoJShxu2GtQSq3M2fAi%2Fimage.png?alt=media&#x26;token=9eb916ac-7b40-4fad-b584-7e7306d938b1" alt=""><figcaption></figcaption></figure>

15. Here click on **Access Control (IAM)**, in the menu on the left to add the Service Principal (App registration created in the previous step) to this storage account, as illustrated in the image below.

<figure><img src="https://1687673077-files.gitbook.io/~/files/v0/b/gitbook-x-prod.appspot.com/o/spaces%2FZ9sinLUl52lDK1vg6b8g%2Fuploads%2F8lcAryvkTsZkQ34gGJFH%2Fimage.png?alt=media&#x26;token=bb84869d-0d50-42d0-9982-77e0c95ea0c6" alt=""><figcaption></figcaption></figure>

16. Here click on **+ Add**, then click on **Add role assignment**, as shown in the image below.

<figure><img src="https://1687673077-files.gitbook.io/~/files/v0/b/gitbook-x-prod.appspot.com/o/spaces%2FZ9sinLUl52lDK1vg6b8g%2Fuploads%2FKv9LZdYxPuuNpriZq3yH%2Fimage.png?alt=media&#x26;token=5fb109f9-1e37-4e26-a9c0-7af544167bb3" alt=""><figcaption></figcaption></figure>

17. Here click on **Members**.

<figure><img src="https://1687673077-files.gitbook.io/~/files/v0/b/gitbook-x-prod.appspot.com/o/spaces%2FZ9sinLUl52lDK1vg6b8g%2Fuploads%2FyacTtCXWmhAVIf5o8irQ%2Fimage.png?alt=media&#x26;token=f5c43649-2449-44c3-b5f4-7f27b4a61dbb" alt=""><figcaption></figcaption></figure>

18. Here click on **+ Select members**.

<figure><img src="https://1687673077-files.gitbook.io/~/files/v0/b/gitbook-x-prod.appspot.com/o/spaces%2FZ9sinLUl52lDK1vg6b8g%2Fuploads%2F86oUbxo1PVhebx3kzdiU%2Fimage.png?alt=media&#x26;token=757e3b0a-85de-4a01-a38f-8015f57ffd80" alt=""><figcaption></figcaption></figure>

19. In the search field, look for the Service Principal (App registration), created, click on the service principal to select it, then click on **select**, as illustrated in the image below.

<figure><img src="https://1687673077-files.gitbook.io/~/files/v0/b/gitbook-x-prod.appspot.com/o/spaces%2FZ9sinLUl52lDK1vg6b8g%2Fuploads%2Fe2cDU778c4dLbDmyErux%2Fimage.png?alt=media&#x26;token=4f0b1683-f66f-4dcc-9d83-c16e8f3afa20" alt=""><figcaption></figcaption></figure>

20. Once the member is selected, now click on role, as illustrated in the image below.

<figure><img src="https://1687673077-files.gitbook.io/~/files/v0/b/gitbook-x-prod.appspot.com/o/spaces%2FZ9sinLUl52lDK1vg6b8g%2Fuploads%2FwTxJaOUSY5G8lcmYsapd%2Fimage.png?alt=media&#x26;token=0efa6755-e17a-45d7-8607-78f1593af9ff" alt=""><figcaption></figcaption></figure>

21. Here in the search field, search for the role (in this case we will use the Reader role), select the searched role as illustrated in the image below.

<figure><img src="https://1687673077-files.gitbook.io/~/files/v0/b/gitbook-x-prod.appspot.com/o/spaces%2FZ9sinLUl52lDK1vg6b8g%2Fuploads%2Fh2G3XkEsvOR742hdPQCl%2Fimage.png?alt=media&#x26;token=16ea59f6-e846-46de-817b-c5b30e85b6a2" alt=""><figcaption></figcaption></figure>

22. Done, Member and read role added to Storage Account billingfocus, as illustrated in the image below. Now click on **Review + assign**, to continue with the next step.

<figure><img src="https://1687673077-files.gitbook.io/~/files/v0/b/gitbook-x-prod.appspot.com/o/spaces%2FZ9sinLUl52lDK1vg6b8g%2Fuploads%2FkNBiXJ4ubXGmoe7UMMLI%2Fimage.png?alt=media&#x26;token=b702a87f-f291-455f-9b70-72ab495afc38" alt=""><figcaption></figcaption></figure>

23. Click on **Storage Browser**.

<figure><img src="https://1687673077-files.gitbook.io/~/files/v0/b/gitbook-x-prod.appspot.com/o/spaces%2FZ9sinLUl52lDK1vg6b8g%2Fuploads%2Fv0GkOJ6W6QcsNSzkQwFT%2Fimage.png?alt=media&#x26;token=b01d4ef2-2f7a-4dac-9da2-291fb7f887e7" alt=""><figcaption></figcaption></figure>

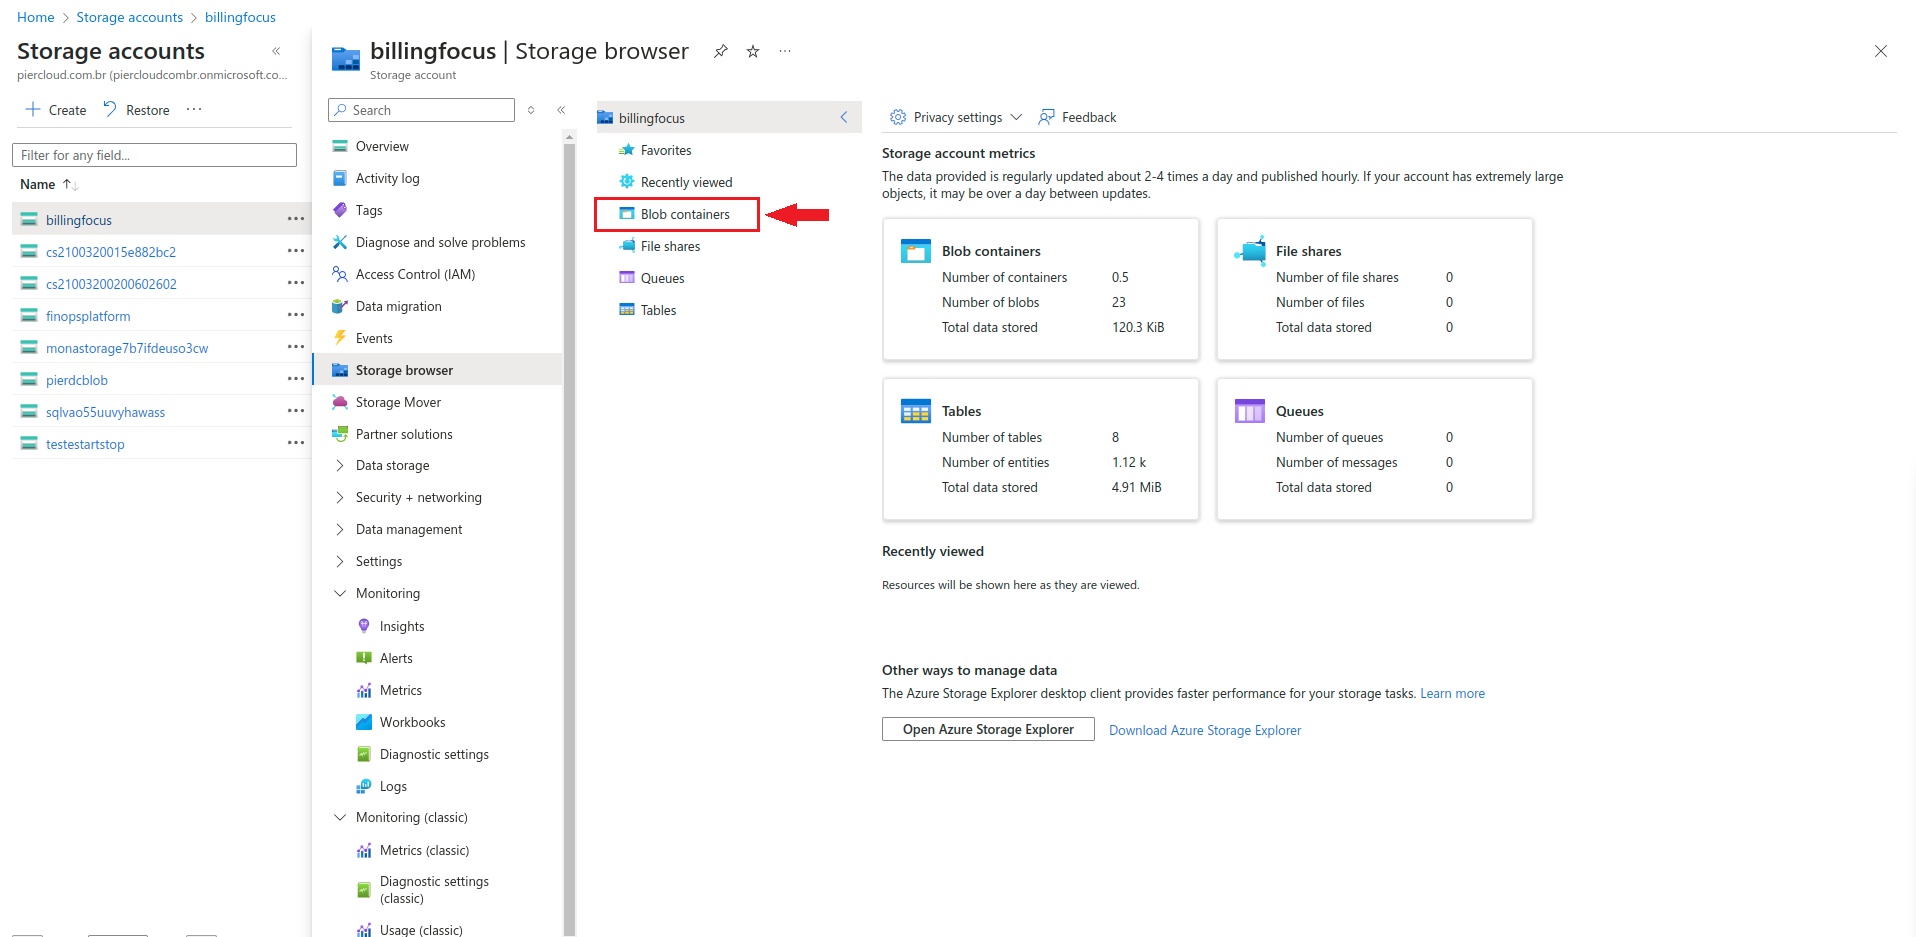
24. Click on the **Blob containers**, as shown in the image below:

<figure><img src="https://1687673077-files.gitbook.io/~/files/v0/b/gitbook-x-prod.appspot.com/o/spaces%2FZ9sinLUl52lDK1vg6b8g%2Fuploads%2F0cWQ7gERcVNcRpqbP6fO%2Fimage.png?alt=media&#x26;token=b80230b6-ff86-4537-a302-ba448429a170" alt=""><figcaption></figcaption></figure>

25. Click on **billingfocus**, as shown in the image below:

<figure><img src="https://1687673077-files.gitbook.io/~/files/v0/b/gitbook-x-prod.appspot.com/o/spaces%2FZ9sinLUl52lDK1vg6b8g%2Fuploads%2F7e9XIOMTDOCpLWmJh4dn%2Fimage.png?alt=media&#x26;token=12f58c0a-cca5-44d5-add4-bd8b747b6be3" alt=""><figcaption></figcaption></figure>

26. Click on the **billingfocus** directory.

<figure><img src="https://1687673077-files.gitbook.io/~/files/v0/b/gitbook-x-prod.appspot.com/o/spaces%2FZ9sinLUl52lDK1vg6b8g%2Fuploads%2FRDOmSuHjNZ1EkLugyWSe%2Fimage.png?alt=media&#x26;token=67f7265b-0634-4eb5-b5d8-9da42dd9d4eb" alt=""><figcaption></figcaption></figure>

27. Click on **pier-focus-cost**.

<figure><img src="https://1687673077-files.gitbook.io/~/files/v0/b/gitbook-x-prod.appspot.com/o/spaces%2FZ9sinLUl52lDK1vg6b8g%2Fuploads%2FSa4K9b9XNrM2HcCQdKZZ%2Fimage.png?alt=media&#x26;token=490cb065-e4db-4f7a-9ee7-ad7228ac5ea1" alt=""><figcaption></figcaption></figure>

28. Click on the directory **20240901-20240930**, as shown in the image below:

<figure><img src="https://1687673077-files.gitbook.io/~/files/v0/b/gitbook-x-prod.appspot.com/o/spaces%2FZ9sinLUl52lDK1vg6b8g%2Fuploads%2F7JExoSz4JHGwnhLV8i9q%2Fimage.png?alt=media&#x26;token=61040c96-f645-4900-8a58-b9080748ab74" alt=""><figcaption></figcaption></figure>

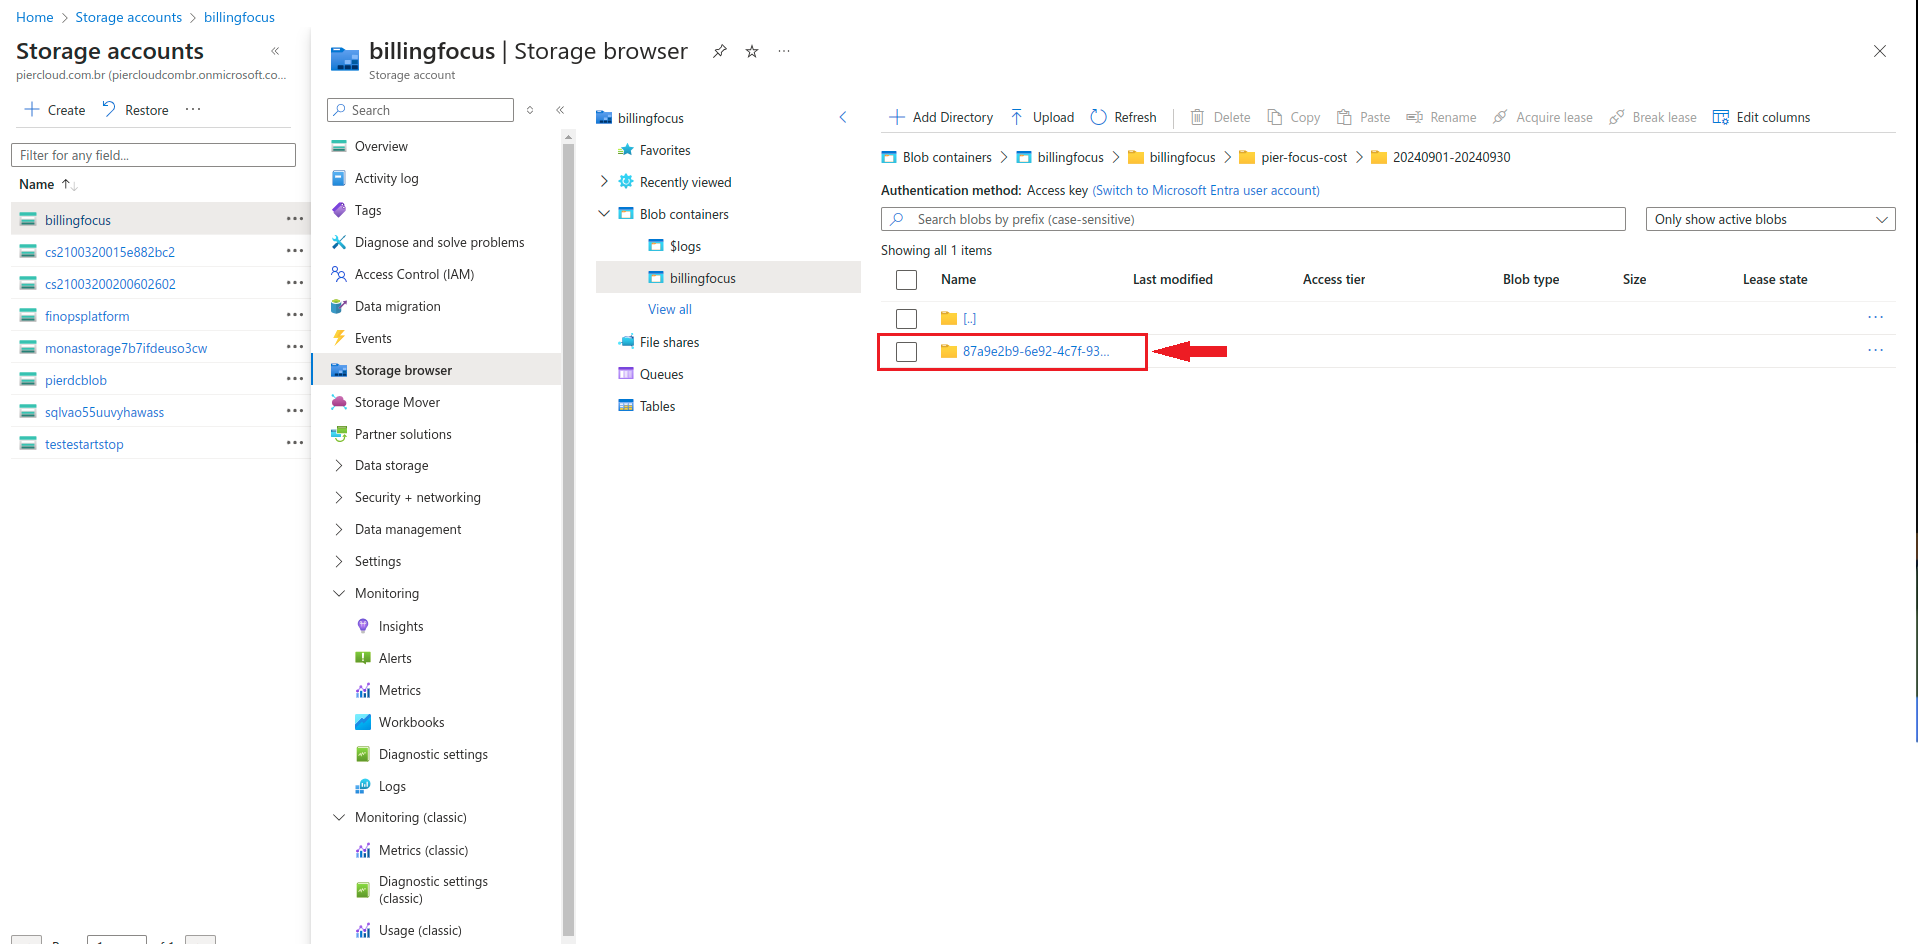
29. Click on the directory **87a9e2b9-6e92-4c7f-9323-bb2b5d0598ff**, as shown in the image below:

<figure><img src="https://1687673077-files.gitbook.io/~/files/v0/b/gitbook-x-prod.appspot.com/o/spaces%2FZ9sinLUl52lDK1vg6b8g%2Fuploads%2F206jQxXdeKhd6h4FTctz%2Fimage.png?alt=media&#x26;token=f41c5fbe-0056-4d41-9905-1d275dc7e3ab" alt=""><figcaption></figcaption></figure>

30. In this step, we will obtain information related to the path where the files will be saved and the format in which they will be stored.

**Note**: Make sure to save this information in a notepad as you will need it later to configure the platform. Example path: /billingfocus/pier-focus-cost/. Important: These files will only be available after the configuration is complete and Export is run.

<figure><img src="https://1687673077-files.gitbook.io/~/files/v0/b/gitbook-x-prod.appspot.com/o/spaces%2FZ9sinLUl52lDK1vg6b8g%2Fuploads%2FC4SyPsLDK8uHUudCtPdf%2Fimage.png?alt=media&#x26;token=f6ac9336-fe04-451b-8fe4-086d8119cea5" alt=""><figcaption></figcaption></figure>

31. Now, we need to configure Focus Billing. On the Azure portal home page, use the search field and look for Cost Export, as shown in the image below.

<figure><img src="https://1687673077-files.gitbook.io/~/files/v0/b/gitbook-x-prod.appspot.com/o/spaces%2FZ9sinLUl52lDK1vg6b8g%2Fuploads%2Fnic6JTckvbHFSGmlI4WI%2Fimage.png?alt=media&#x26;token=da4504c9-4d90-4af4-a2c1-d4d86b4a4d38" alt=""><figcaption></figcaption></figure>

32. Select the scope that contains your configured Billing account, click on **Scope**, as illustrated in the image below.

<figure><img src="https://1687673077-files.gitbook.io/~/files/v0/b/gitbook-x-prod.appspot.com/o/spaces%2FZ9sinLUl52lDK1vg6b8g%2Fuploads%2FcW8B0PD1TmNxmU6fCQHv%2Fimage.png?alt=media&#x26;token=274eb942-f0ce-449e-b6de-77c593877df5" alt=""><figcaption></figcaption></figure>

33. Here, select the **Pay-As-You-Go** scope (the scope in which the billing account used in this documentation was configured), and then click Select.

<figure><img src="https://1687673077-files.gitbook.io/~/files/v0/b/gitbook-x-prod.appspot.com/o/spaces%2FZ9sinLUl52lDK1vg6b8g%2Fuploads%2FRETjZmCDExhsESawgKRS%2Fimage.png?alt=media&#x26;token=ea1aed08-a7c7-402d-8772-d6e9e5e156bc" alt=""><figcaption></figcaption></figure>

34. After selecting the correct scope, click **+ Create**.

<figure><img src="https://1687673077-files.gitbook.io/~/files/v0/b/gitbook-x-prod.appspot.com/o/spaces%2FZ9sinLUl52lDK1vg6b8g%2Fuploads%2Fxe8yrM8kYxaMADAw4fdV%2Fimage.png?alt=media&#x26;token=3fa37e26-7eb8-43d5-8802-18f2b6b7d784" alt=""><figcaption></figcaption></figure>

35. Here select **Cost and usage(FOCUS)**, as shown in the image below:

<figure><img src="https://1687673077-files.gitbook.io/~/files/v0/b/gitbook-x-prod.appspot.com/o/spaces%2FZ9sinLUl52lDK1vg6b8g%2Fuploads%2F1eh0Hez4ZgiiSM51rDXn%2Fimage.png?alt=media&#x26;token=ff4b27a2-c73c-4e55-91f4-49ccefed95a4" alt=""><figcaption></figcaption></figure>

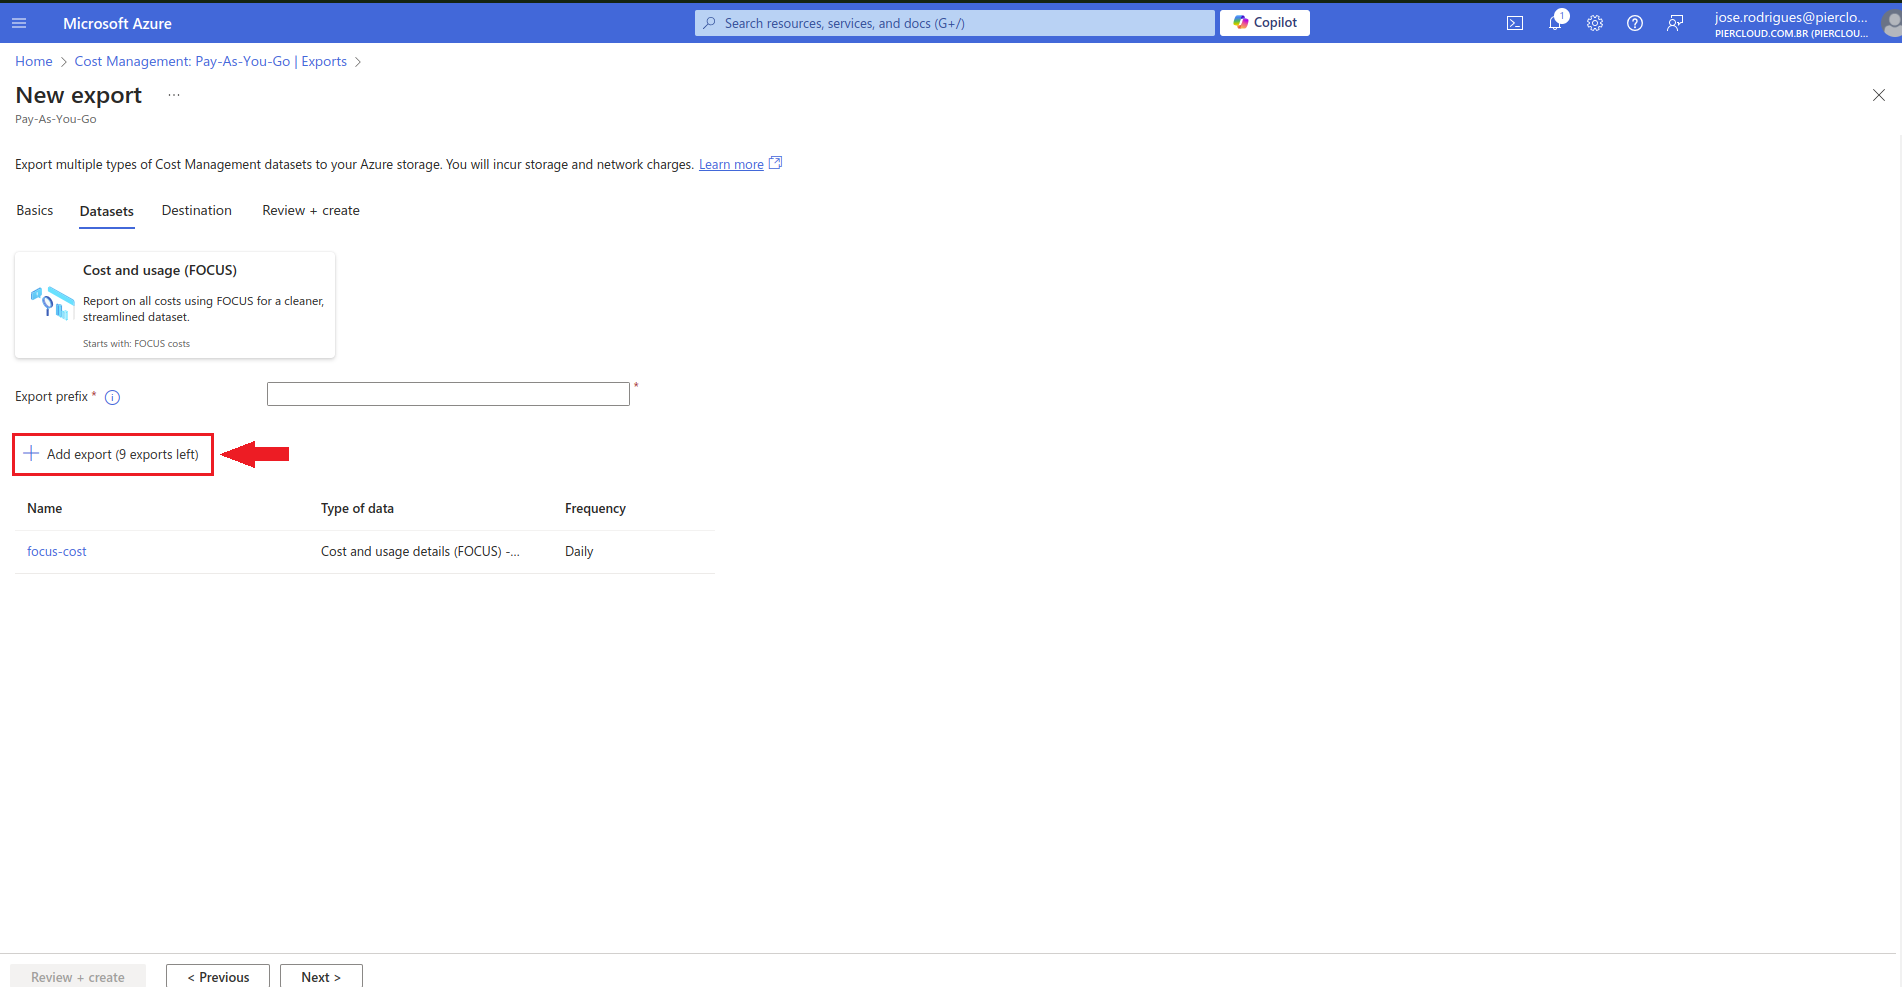
36. Here click on **Add export**.

<figure><img src="https://1687673077-files.gitbook.io/~/files/v0/b/gitbook-x-prod.appspot.com/o/spaces%2FZ9sinLUl52lDK1vg6b8g%2Fuploads%2FnN0sk7YQQw5o59i4cj4j%2Fimage.png?alt=media&#x26;token=5572c1e7-7996-4903-bb41-7a32104ff6ca" alt=""><figcaption></figcaption></figure>

37. Here, you must fill in the following fields:

    * **Type of data**: Select "**Cost and usage details (FOCUS) - Preview**".
    * **Export name**: Enter a name for identification.
    * **Dataset version**: Choose version 1.0.
    * **Frequency**: Select "**Daily export of month-to-date cost**".
    * **Export description**: This field is optional.

    After filling it in, click **Add** to finish.

<figure><img src="https://1687673077-files.gitbook.io/~/files/v0/b/gitbook-x-prod.appspot.com/o/spaces%2FZ9sinLUl52lDK1vg6b8g%2Fuploads%2F7Tu32kLUB77lHSLXo3ia%2Fimage.png?alt=media&#x26;token=fe03577f-c8ad-4726-a6a9-4e62d7958f3c" alt="" width="563"><figcaption></figcaption></figure>

38. Export created successfully. We can move on to the next step.

<figure><img src="https://1687673077-files.gitbook.io/~/files/v0/b/gitbook-x-prod.appspot.com/o/spaces%2FZ9sinLUl52lDK1vg6b8g%2Fuploads%2F6Rbxbw7PQ1tz9NMhKR45%2Fimage.png?alt=media&#x26;token=30b90846-1f7f-438a-a527-f1795c519319" alt=""><figcaption></figcaption></figure>

39. In this step, enter a name in the **Export Prefix** field and then click **Next** to proceed.

<figure><img src="https://1687673077-files.gitbook.io/~/files/v0/b/gitbook-x-prod.appspot.com/o/spaces%2FZ9sinLUl52lDK1vg6b8g%2Fuploads%2F4arY3Ujog3cyIDV4POwy%2Fimage.png?alt=media&#x26;token=a0c3abf2-c9bb-4126-ab14-8d99d3d43f0e" alt=""><figcaption></figcaption></figure>

40. Fill in and select the following fields:

    * **Storage type**: Choose the storage type. In this case, it will be "Azure Blob Storage".
    * **Destination and storage**: You can choose to use an existing storage or create a new one.
    * **Subscription**: Select the environment where the storage was created.
    * **Container**: Resource created within the storage that organizes directories and folders.
    * **Directory**: Directory with the path where the files will be saved.
    * **Format**: Choose the format of the file to be saved in the directory (select **Parquet**).
    * **Compression type**: Type of file compression (select **Snappy**).

    After filling in and selecting all the options, click **Next** to continue.

<figure><img src="https://1687673077-files.gitbook.io/~/files/v0/b/gitbook-x-prod.appspot.com/o/spaces%2FZ9sinLUl52lDK1vg6b8g%2Fuploads%2FhnJlz4CNlMJZi2TY6Hs9%2Fimage.png?alt=media&#x26;token=c1b1b59a-75d4-496b-9e4b-9542f0885095" alt="" width="563"><figcaption></figcaption></figure>

41. Now, review all the information to ensure it is correct and click **Create** to finish creating the Export.

<figure><img src="https://1687673077-files.gitbook.io/~/files/v0/b/gitbook-x-prod.appspot.com/o/spaces%2FZ9sinLUl52lDK1vg6b8g%2Fuploads%2FhpYDPqZbkhMFHGdjOQ2B%2Fimage.png?alt=media&#x26;token=312a939d-126b-4ff7-95a0-53c0e1a82cf0" alt=""><figcaption></figcaption></figure>

42. Export created and activated successfully as shown in the image below.

**Note**: To speed up the export process, you can click **Run now**.

<figure><img src="https://1687673077-files.gitbook.io/~/files/v0/b/gitbook-x-prod.appspot.com/o/spaces%2FZ9sinLUl52lDK1vg6b8g%2Fuploads%2FSH1pXH3HRM0uQIik1EKJ%2Fimage.png?alt=media&#x26;token=a4a23f0c-6931-46b5-bc60-823744ba8955" alt=""><figcaption></figcaption></figure>

### On the Pier Cloud Platform

1. On the Platform home page, click on the user icon and then select **Settings** as shown in the image below:

<figure><img src="https://1687673077-files.gitbook.io/~/files/v0/b/gitbook-x-prod.appspot.com/o/spaces%2FZ9sinLUl52lDK1vg6b8g%2Fuploads%2FHT4lffQXduOJNhlYSXFg%2Fimage.png?alt=media&#x26;token=c2ab0664-daa1-4c48-b115-405477103ee8" alt=""><figcaption></figcaption></figure>

2. In the menu on the left, select **Secrets**.

<figure><img src="https://1687673077-files.gitbook.io/~/files/v0/b/gitbook-x-prod.appspot.com/o/spaces%2FZ9sinLUl52lDK1vg6b8g%2Fuploads%2FLCTiZk4DzeCHenZsFUTr%2Fimage.png?alt=media&#x26;token=ccb73d21-2733-48bf-83b0-5bb76f9b9771" alt=""><figcaption></figcaption></figure>

3. In the top right corner, click **+ Add.**

<figure><img src="https://1687673077-files.gitbook.io/~/files/v0/b/gitbook-x-prod.appspot.com/o/spaces%2FZ9sinLUl52lDK1vg6b8g%2Fuploads%2FVCGw49Mgj7m8b2zYkrzl%2Fimage.png?alt=media&#x26;token=ce015ab5-f5d6-4cc9-83c8-dfebd1073fa7" alt=""><figcaption></figcaption></figure>

4. Fill in the fields, as instructed below:

   * In the "Name" field, enter the name to identify the secret (Secret); in this example, we will use "Azure Focus".
   * In "Type", select the type of secret. In Azure, there are two types available: "Azure" and "Azure Billing". In this case, we will choose "Azure".
   * In the "Tenant ID" field, enter the Tenant ID obtained during the creation of the Service Principal (App Registration), as shown on step 8. Note: the field is blank so as not to expose the Tenant ID of the account used in the documentation.
   * In "Client ID", enter the key obtained in the "Application (client) ID" field from the process described on step 8.
   * In the "Client Secret" field, enter the value generated in the Secret creation process, shown on step 11.
   * Finally, click "Save" to complete the creation of the secret, as illustrated in the image below.

   <figure><img src="https://1687673077-files.gitbook.io/~/files/v0/b/gitbook-x-prod.appspot.com/o/spaces%2FZ9sinLUl52lDK1vg6b8g%2Fuploads%2FQOhNlkwtSuEvfQSjsrRb%2Fimage.png?alt=media&#x26;token=56adf868-3fc8-4f4d-a321-0bdad227d131" alt=""><figcaption></figcaption></figure>
5. Done, Secret created successfully! Now we can proceed to the next step.

<figure><img src="https://1687673077-files.gitbook.io/~/files/v0/b/gitbook-x-prod.appspot.com/o/spaces%2FZ9sinLUl52lDK1vg6b8g%2Fuploads%2FXmJ5TuQBSYJdkgheppyA%2Fimage.png?alt=media&#x26;token=1e7dbf77-aecb-41dd-b021-66e3dc22639a" alt=""><figcaption></figcaption></figure>

6. In the left menu, select **Billing Connectors**.

<figure><img src="https://1687673077-files.gitbook.io/~/files/v0/b/gitbook-x-prod.appspot.com/o/spaces%2FZ9sinLUl52lDK1vg6b8g%2Fuploads%2F1dqga6XnWNMQZcLuO441%2Fimage.png?alt=media&#x26;token=88d1d0d7-c8e2-4350-9ae8-7181264c1ed7" alt=""><figcaption></figcaption></figure>

7. In this step, click on **+ Add Connector** in the top right menu as shown in the image below.

<figure><img src="https://1687673077-files.gitbook.io/~/files/v0/b/gitbook-x-prod.appspot.com/o/spaces%2FZ9sinLUl52lDK1vg6b8g%2Fuploads%2F0TTpAJvaIq1pzyXprqbX%2Fimage.png?alt=media&#x26;token=ffcce7b7-e92f-4b6c-87c8-535ebfb746ef" alt=""><figcaption></figcaption></figure>

8. Here, select **FOCUS** in the **Type** field and in the **Cloud Provider** field, choose **Azure (Microsoft Azure)** as shown in the image below.

<figure><img src="https://1687673077-files.gitbook.io/~/files/v0/b/gitbook-x-prod.appspot.com/o/spaces%2FZ9sinLUl52lDK1vg6b8g%2Fuploads%2FHMzPv7fxHBKxL88Z5vEo%2Fimage.png?alt=media&#x26;token=016ec9b1-49ac-45ff-bb55-abd79ebc205a" alt=""><figcaption></figcaption></figure>

9. Fill in the fields, as instructed below:

   * In the "**Billing Connector Identification**" field, enter the name that will identify the Data Connector (in this case, we will use Billing Focus Azure).
   * In the "**Secret for this billing connector**" field, select the secret created in the previous step (Azure Focus).
   * In the "**Region**" field, we will leave it as default.
   * In the "**Name of the Storage that contains the billing data**" field, add the information obtained on step 40.
   * Then, in the "**Path that contains the billing information**" field, enter the path as indicated on step 40.

   To finish and create the Data Connector, click Save, as illustrated in the image on the side.

<figure><img src="https://1687673077-files.gitbook.io/~/files/v0/b/gitbook-x-prod.appspot.com/o/spaces%2FZ9sinLUl52lDK1vg6b8g%2Fuploads%2FQfvsLY7GT2Wk08VKJu4e%2Fimage.png?alt=media&#x26;token=e6591f7e-ec9c-4104-989d-de591d1612fa" alt=""><figcaption></figcaption></figure>

9. The **FOCUS AZURE** Billing connector is ready and configured.

<figure><img src="https://1687673077-files.gitbook.io/~/files/v0/b/gitbook-x-prod.appspot.com/o/spaces%2FZ9sinLUl52lDK1vg6b8g%2Fuploads%2FgntVKUyM5avJXw7NVEef%2Fimage.png?alt=media&#x26;token=9b3fdf2d-7cf9-4525-aac9-b445e0012c4d" alt=""><figcaption></figcaption></figure>
