# Pier Cloud Platform – CCA Configuration for GCP

## CCA Configuration Process for GCP Provider

#### Welcome to Pier Cloud!

Pier Cloud is our centralized platform for managing cloud data and services. Our focus is to ensure that access to resources is secure, practical, and efficient. This document was elaborated to guide you through the configuration of the CCA product for the GCP provider.

In the next slides, you will find a detailed process that explains each step clearly and objectively.

### In the GCP environment (Google Cloud Provider)

1. Access the GCP portal, click on **IAM and Admin**, as shown in the image below.

<figure><img src="https://1687673077-files.gitbook.io/~/files/v0/b/gitbook-x-prod.appspot.com/o/spaces%2FZ9sinLUl52lDK1vg6b8g%2Fuploads%2FpLpWffds5Z3fOtqAjQNU%2Fimage.png?alt=media&#x26;token=3a64255f-83ab-4cd9-a4c3-58bec6f03632" alt=""><figcaption></figcaption></figure>

2. In the bottom left menu, click on **Service Accounts**.

<figure><img src="https://1687673077-files.gitbook.io/~/files/v0/b/gitbook-x-prod.appspot.com/o/spaces%2FZ9sinLUl52lDK1vg6b8g%2Fuploads%2FsLX070OJBdKUInZJLTvs%2Fimage.png?alt=media&#x26;token=cdb725b4-8022-4990-a807-6a7bb1abbdb4" alt=""><figcaption></figcaption></figure>

3. Here click on **+ CREATE SERVICE ACCOUNT**, as illustrated in the image below.

<figure><img src="https://1687673077-files.gitbook.io/~/files/v0/b/gitbook-x-prod.appspot.com/o/spaces%2FZ9sinLUl52lDK1vg6b8g%2Fuploads%2FLgrdJKCsES5Tt3h4rV1s%2Fimage.png?alt=media&#x26;token=a4857f4f-8093-4e7b-948e-ea954923ca66" alt=""><figcaption></figcaption></figure>

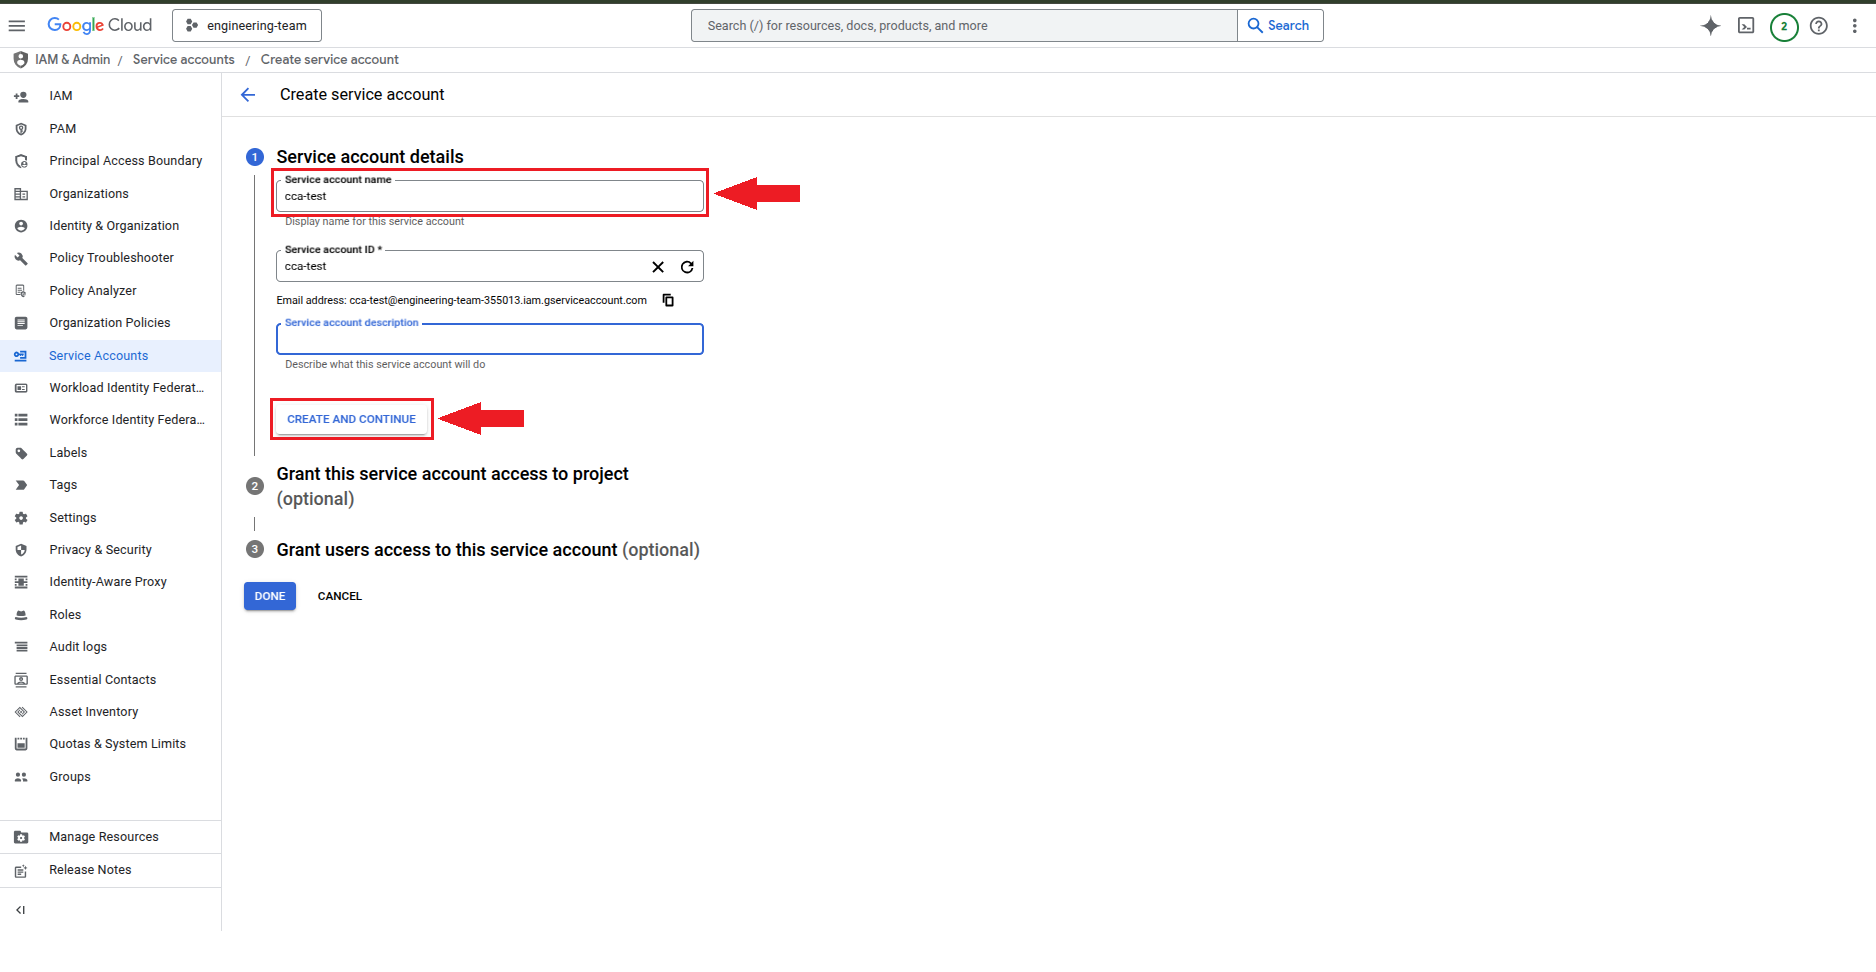
4. Here, in the **Service Account Name** field, enter a name for identification and then click **CREATE AND CONTINUE**, as illustrated in the image below.

<figure><img src="https://1687673077-files.gitbook.io/~/files/v0/b/gitbook-x-prod.appspot.com/o/spaces%2FZ9sinLUl52lDK1vg6b8g%2Fuploads%2FRYl9PdGAGBoGZzuHpNlY%2Fimage.png?alt=media&#x26;token=1e78e8f6-52de-4e38-9680-464dfeb16a7d" alt=""><figcaption></figcaption></figure>

5. Here, click on the **Select Role** field and then choose the **Basic and Viewe**r options as illustrated in the image below.

<figure><img src="https://1687673077-files.gitbook.io/~/files/v0/b/gitbook-x-prod.appspot.com/o/spaces%2FZ9sinLUl52lDK1vg6b8g%2Fuploads%2FRCfAJgh1XnoctNPE605Q%2Fimage.png?alt=media&#x26;token=05efb806-c832-4795-891c-c4f1d2f5bdc2" alt=""><figcaption></figcaption></figure>

6. Here Click **CONTINUE**, as illustrated in the image below.

<figure><img src="https://1687673077-files.gitbook.io/~/files/v0/b/gitbook-x-prod.appspot.com/o/spaces%2FZ9sinLUl52lDK1vg6b8g%2Fuploads%2Fn2VvBAV0RmttOQdCLglD%2Fimage.png?alt=media&#x26;token=d5da0133-2c40-41e2-9dc0-667d8068994f" alt=""><figcaption></figcaption></figure>

7. Click **Done** to create the Service Account.

<figure><img src="https://1687673077-files.gitbook.io/~/files/v0/b/gitbook-x-prod.appspot.com/o/spaces%2FZ9sinLUl52lDK1vg6b8g%2Fuploads%2Ft5G2WqjAnFtRawU55daB%2Fimage.png?alt=media&#x26;token=e478cfa6-978d-4821-a4b4-5496613af2cf" alt=""><figcaption></figcaption></figure>

8. The Service Account has been successfully created! Now, click on the **Service Account** name as shown in the image below.

<figure><img src="https://1687673077-files.gitbook.io/~/files/v0/b/gitbook-x-prod.appspot.com/o/spaces%2FZ9sinLUl52lDK1vg6b8g%2Fuploads%2Fyj3wcUVyGLOUBewcCTCz%2Fimage.png?alt=media&#x26;token=a6fe69c1-2079-4458-8178-fbfdd4d3efaf" alt=""><figcaption></figcaption></figure>

9. Here click on **KEYS**.

<figure><img src="https://1687673077-files.gitbook.io/~/files/v0/b/gitbook-x-prod.appspot.com/o/spaces%2FZ9sinLUl52lDK1vg6b8g%2Fuploads%2F3pQ7LWbToawnDafCryHA%2Fimage.png?alt=media&#x26;token=92903728-ac8f-47fe-997f-ca52e4f687c9" alt=""><figcaption></figcaption></figure>

10. Here, click on **ADD KEY** and then select the **Create New Key** option as illustrated in the image below.

<figure><img src="https://1687673077-files.gitbook.io/~/files/v0/b/gitbook-x-prod.appspot.com/o/spaces%2FZ9sinLUl52lDK1vg6b8g%2Fuploads%2FvE1zNnmzPRyrvG5VzBUG%2Fimage.png?alt=media&#x26;token=5d85c57f-7eab-4118-aef3-84c9f77ce9eb" alt=""><figcaption></figcaption></figure>

11. In this step, select the **JSON** option, then click **CREATE** to generate the key.

<figure><img src="https://1687673077-files.gitbook.io/~/files/v0/b/gitbook-x-prod.appspot.com/o/spaces%2FZ9sinLUl52lDK1vg6b8g%2Fuploads%2Fv57wfzXllM7WoFLuZnHr%2Fimage.png?alt=media&#x26;token=9c0d201e-ba13-431b-b6b0-be2c86e62acf" alt="" width="481"><figcaption></figcaption></figure>

12. The **Service Account** key has been created successfully! Click **CLOSE** as shown in the image below.&#x20;

**Note**: The key has been downloaded and is saved in the **Downloads** folder on your computer.

<figure><img src="https://1687673077-files.gitbook.io/~/files/v0/b/gitbook-x-prod.appspot.com/o/spaces%2FZ9sinLUl52lDK1vg6b8g%2Fuploads%2FEUMhramMNGnQsSjf5qK5%2Fimage.png?alt=media&#x26;token=7d0d04ad-285c-4e59-b3cf-a225d9eb6afb" alt=""><figcaption></figcaption></figure>

13. With the Service Account key created, we can configure the CCA on the Platform.

<figure><img src="https://1687673077-files.gitbook.io/~/files/v0/b/gitbook-x-prod.appspot.com/o/spaces%2FZ9sinLUl52lDK1vg6b8g%2Fuploads%2FaOMCQs5OZKLGZkiGbE3b%2Fimage.png?alt=media&#x26;token=882e16aa-7344-46f4-a959-5ac9b2c1a507" alt=""><figcaption></figcaption></figure>

14. For configuration on the Platform we need the Project ID information, for this we need to click on the field with the **project name**, as illustrated in the image below.

<figure><img src="https://1687673077-files.gitbook.io/~/files/v0/b/gitbook-x-prod.appspot.com/o/spaces%2FZ9sinLUl52lDK1vg6b8g%2Fuploads%2FcjcdltNZ8U5Two1eqW8U%2Fimage.png?alt=media&#x26;token=1ea134f7-ecf8-40b5-b3c7-4b22c2ba9084" alt=""><figcaption></figcaption></figure>

15. After clicking on the field with the project name you will be redirected to this step where we can obtain the **Project ID**, as illustrated in the image below.

<figure><img src="https://1687673077-files.gitbook.io/~/files/v0/b/gitbook-x-prod.appspot.com/o/spaces%2FZ9sinLUl52lDK1vg6b8g%2Fuploads%2FAgKPNRi9663LkL2EB9gH%2Fimage.png?alt=media&#x26;token=51193a72-2149-41b0-8332-b18f00bcb98a" alt=""><figcaption></figcaption></figure>

16. Here is the service Account key file created.

<figure><img src="https://lh7-rt.googleusercontent.com/slidesz/AGV_vUdX0nYS1gyg6RPkB81wTayrTNP2AkjvsxRS4qOfE80lG1clES0aV8H4oGhcntSdUXIcFEuAaIeIEp7270jsUgodenHmlzFnVdB99FZuI-ZniiKMddL6Ts8yevc2oPZ9YqWNfZzQ=s2048?key=nIaOHPRk_lLzjMPejy3bBr_P" alt=""><figcaption></figcaption></figure>
