# On-Premise Costs

It is a Lighthouse feature enabled for the On-Premises context, allowing you to view On-Premises costs for each registered Data Center and configure additional information for each one.

## How to access the On-Premises Costs feature:

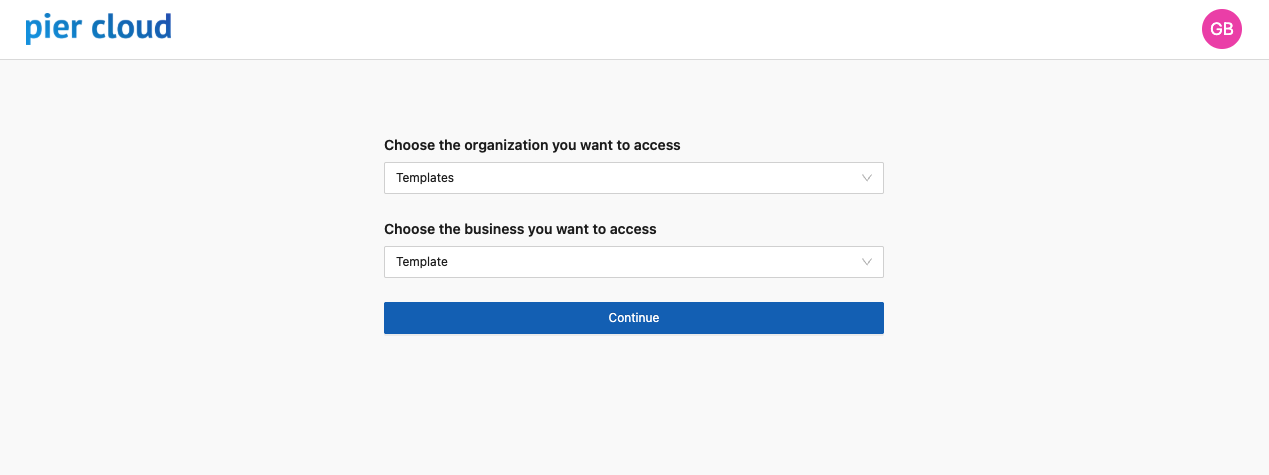
1. Select the Organization:

<figure><img src="https://1687673077-files.gitbook.io/~/files/v0/b/gitbook-x-prod.appspot.com/o/spaces%2FZ9sinLUl52lDK1vg6b8g%2Fuploads%2FzvKqy0abHTTRAVKu0m9g%2Fimage.png?alt=media&#x26;token=085dc19f-f1eb-4de3-8960-4135a406096e" alt=""><figcaption></figcaption></figure>

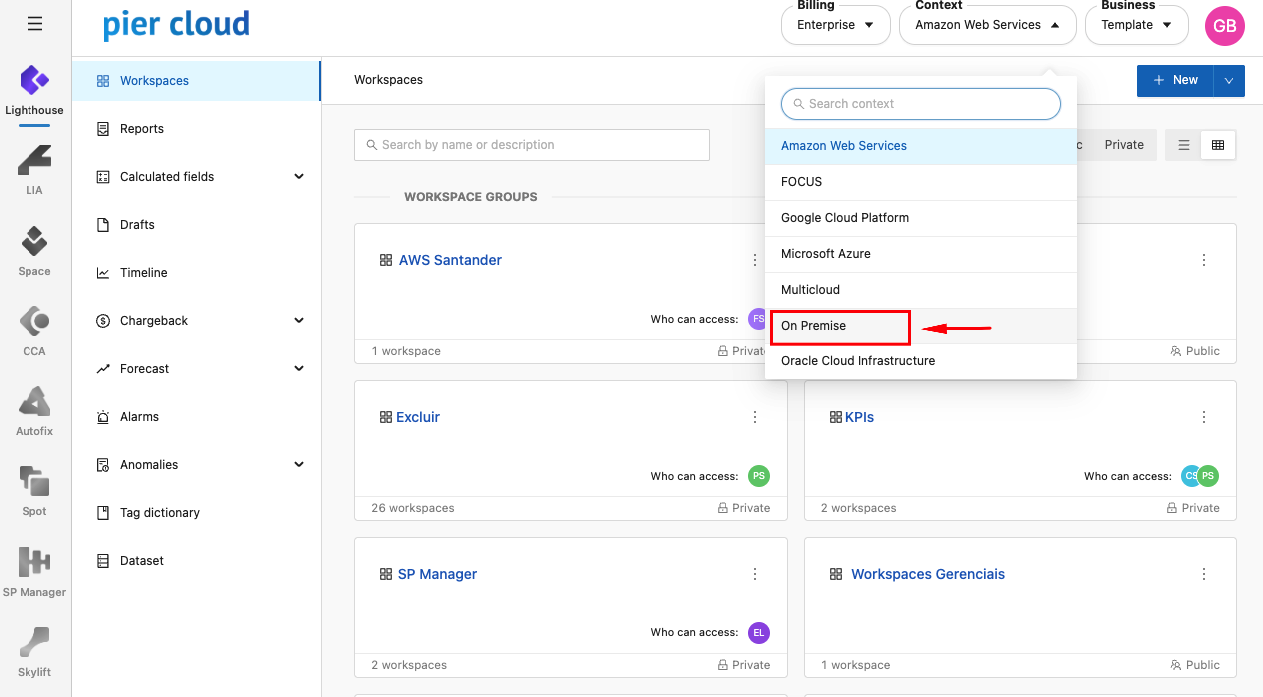
2. After clicking Continue, select the **On-Premises Context** in the upper-right corner:

<figure><img src="https://1687673077-files.gitbook.io/~/files/v0/b/gitbook-x-prod.appspot.com/o/spaces%2FZ9sinLUl52lDK1vg6b8g%2Fuploads%2FGphJTS0k1utJq2jI39oE%2Fimage.png?alt=media&#x26;token=2e3537ec-462d-4584-a93f-de54cd275007" alt=""><figcaption></figcaption></figure>

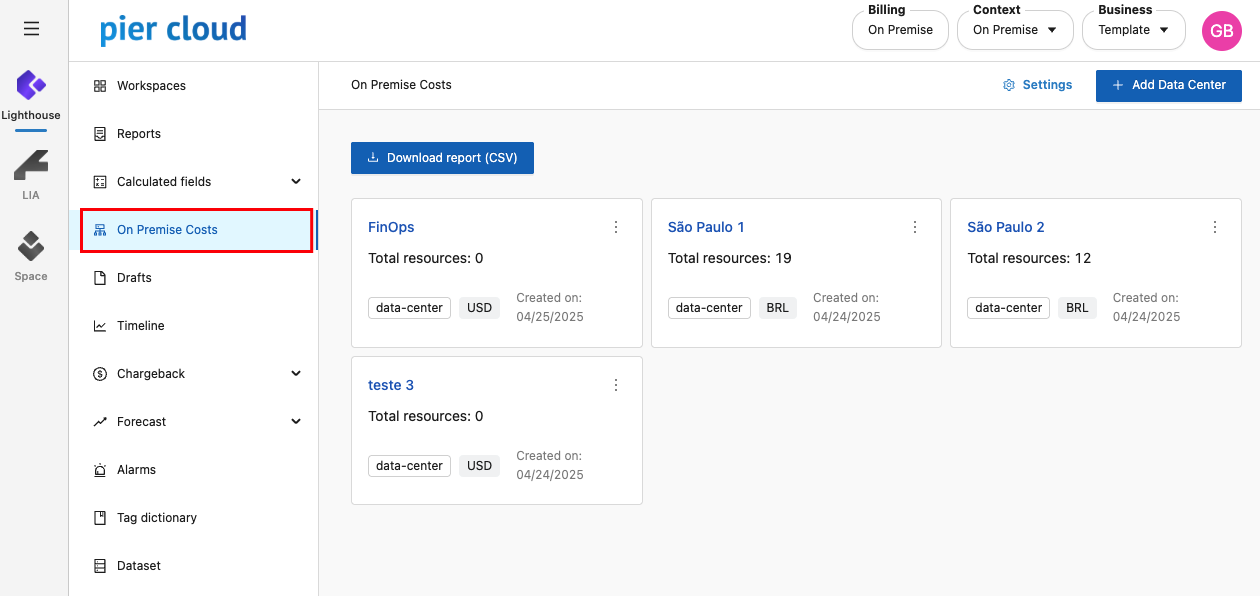
3. In Lighthouse, select the **On-Premises Costs** feature:

<figure><img src="https://1687673077-files.gitbook.io/~/files/v0/b/gitbook-x-prod.appspot.com/o/spaces%2FZ9sinLUl52lDK1vg6b8g%2Fuploads%2FaQ8f5rlPi6xxEtdeFq31%2Fimage.png?alt=media&#x26;token=e54c8f38-cfb3-4e5d-b95a-d42451cf3849" alt=""><figcaption></figcaption></figure>

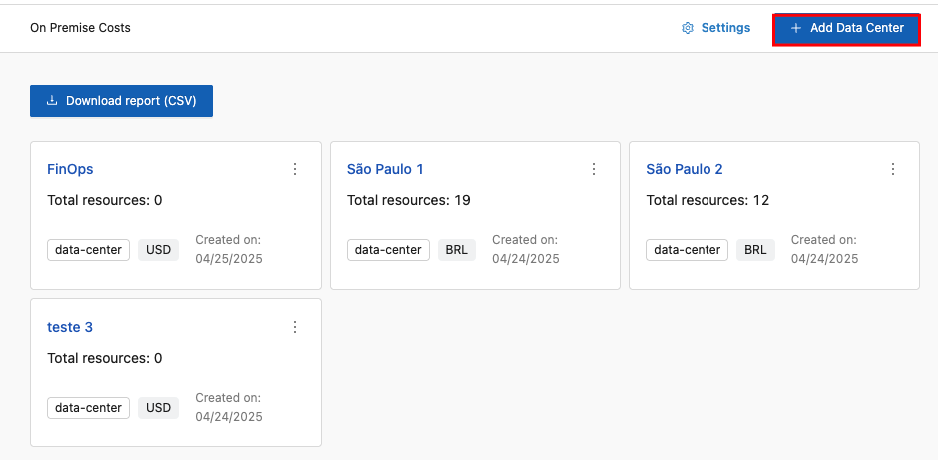
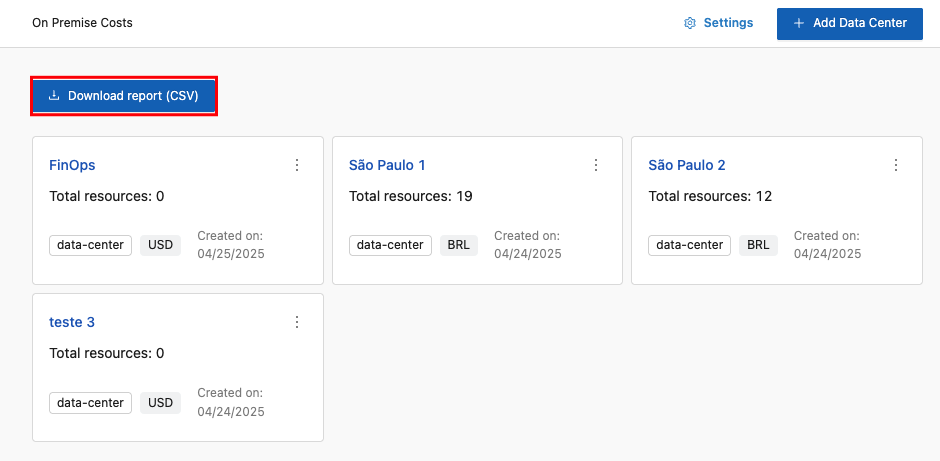
4. The system displays the main On-Premises Costs screen, which shows the list of registered Data Centres and allows you to add new ones by clicking the “**+ Add Data Center**” button.

<figure><img src="https://1687673077-files.gitbook.io/~/files/v0/b/gitbook-x-prod.appspot.com/o/spaces%2FZ9sinLUl52lDK1vg6b8g%2Fuploads%2F01m3f9oPS3hBuWmQxWYR%2Fimage.png?alt=media&#x26;token=f447d207-f044-4f8e-8188-5ddaa29564e5" alt=""><figcaption></figcaption></figure>

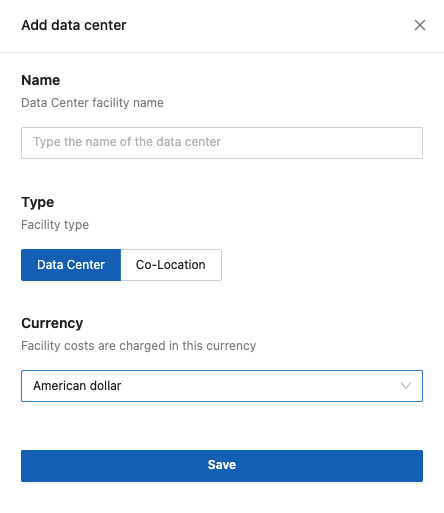
5. The system will display the screen to register a new Data Center, where you must provide the following information:

   * **Name**: Enter the name that represents the Data Center you want to register.
   * **Type**: Specify whether the facility type refers to a standard Data Center or a Colocation, which applies when the company’s servers and IT equipment are hosted in a rented Data Center.
   * **Currency**: Specify the currency in which the installation costs are charged. Select one of the available options (Brazilian Real, US Dollar, Mexican Peso, Chinese Yuan, or Euro).

   <figure><img src="https://1687673077-files.gitbook.io/~/files/v0/b/gitbook-x-prod.appspot.com/o/spaces%2FZ9sinLUl52lDK1vg6b8g%2Fuploads%2F4iXfUerZz9r9pk4unVD5%2Fimage.png?alt=media&#x26;token=60986062-1819-4e76-a2e0-53857ba5d99c" alt=""><figcaption></figcaption></figure>
6. After filling in all the information, click the **Save** button. The system will register the new Data Center and return to the main screen.

<figure><img src="https://1687673077-files.gitbook.io/~/files/v0/b/gitbook-x-prod.appspot.com/o/spaces%2FZ9sinLUl52lDK1vg6b8g%2Fuploads%2FzZWxdvVemm7BPDrtTrTd%2Fimage.png?alt=media&#x26;token=0c31323f-886b-4be7-8026-6be0696b97ec" alt=""><figcaption></figcaption></figure>

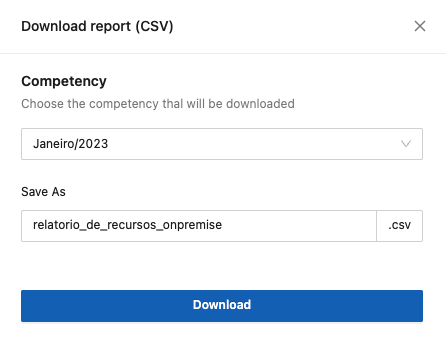
7. On the main screen, click the “Download Report (CSV)” option. The system will display the download screen, where you must provide the following information:

* **Period:** Select the month/year you want to download.
* **Save as:** Enter the name you want to assign to the report.

<figure><img src="https://1687673077-files.gitbook.io/~/files/v0/b/gitbook-x-prod.appspot.com/o/spaces%2FZ9sinLUl52lDK1vg6b8g%2Fuploads%2Fx6TD7AW2eONYjOmTWaWj%2Fimage.png?alt=media&#x26;token=18aa7ec3-ebe5-4ea5-a458-3eedeb3781dd" alt=""><figcaption></figcaption></figure>

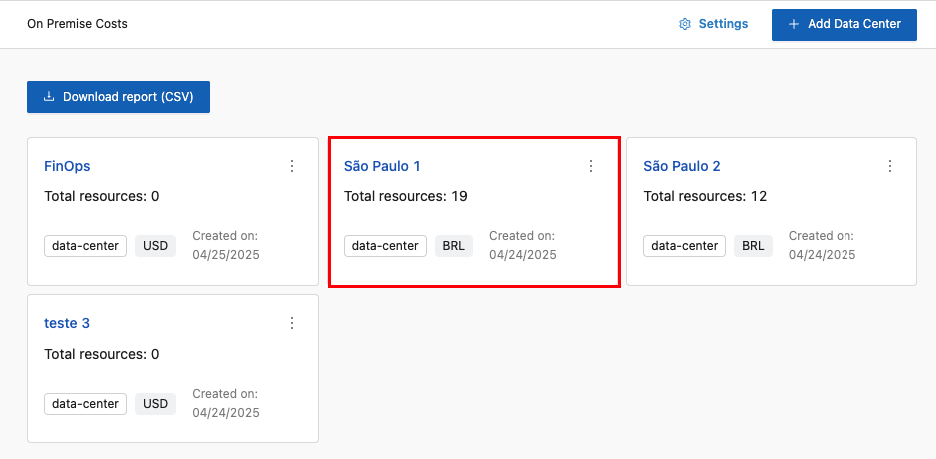
7. Click the desired Data Center, as highlighted below:

<figure><img src="https://1687673077-files.gitbook.io/~/files/v0/b/gitbook-x-prod.appspot.com/o/spaces%2FZ9sinLUl52lDK1vg6b8g%2Fuploads%2FmvRNX6OXjkNDoRDTsjD6%2Fimage.png?alt=media&#x26;token=4d195dd7-9c97-4901-9ea9-c507757a30c5" alt=""><figcaption></figcaption></figure>

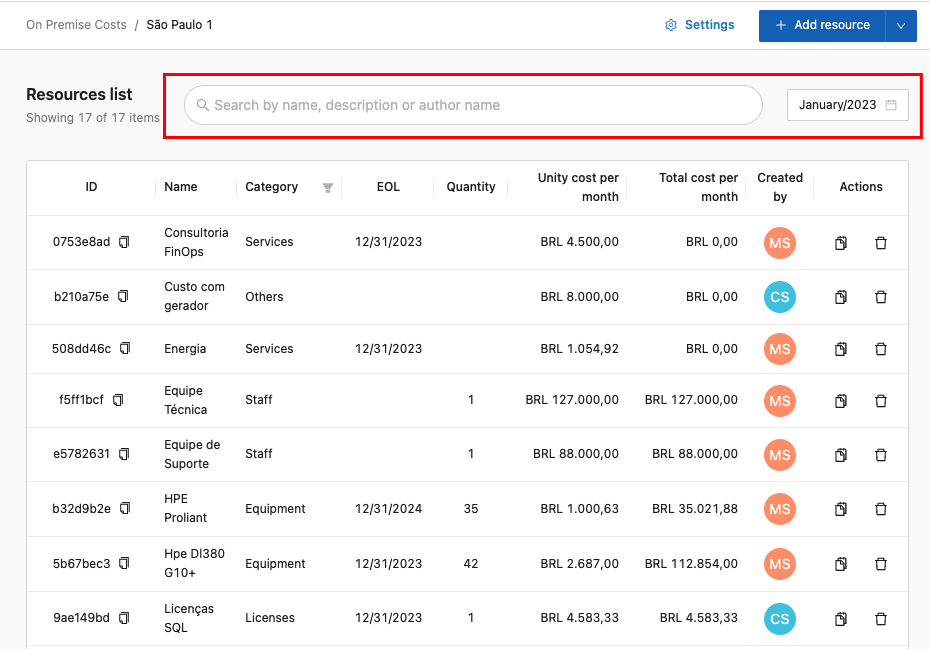
The system will display the list of registered resources and allow you to apply a few filter options:

* **Name**: Search for the resource you want to view by its name.
* **Period**: Filter by the period of the resource you want to view.

<figure><img src="https://1687673077-files.gitbook.io/~/files/v0/b/gitbook-x-prod.appspot.com/o/spaces%2FZ9sinLUl52lDK1vg6b8g%2Fuploads%2F5fIjIzCqwm30oazeCgCW%2Fimage.png?alt=media&#x26;token=334635c1-5c3a-4dc3-9953-210743e80241" alt=""><figcaption></figcaption></figure>

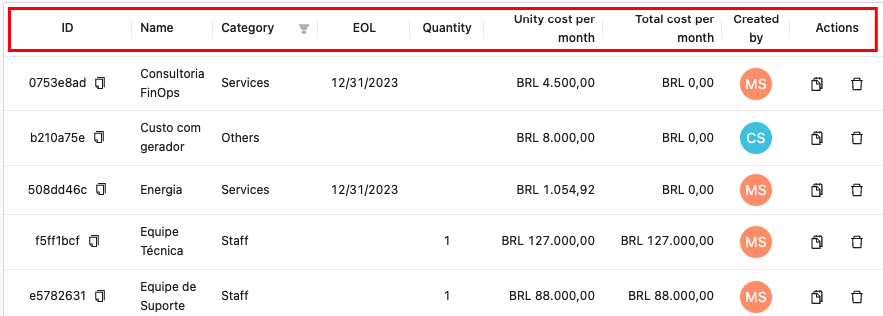
7. In the resource list, the following information will be displayed:

* **ID:** Shows the ID that identifies the resource.
* **Name:** Shows the name of the resource.
* **Category:** Shows the resource category.
* **EOL:** Shows the resource’s EOL.
* **Quantity:** Shows the number of resources.
* **Unit cost/month:** Shows the resource’s monthly unit cost.
* **Total cost/month:** Shows the resource’s total monthly cost.
* **Created by:** Displays the initials of the person who created the resource.

<figure><img src="https://1687673077-files.gitbook.io/~/files/v0/b/gitbook-x-prod.appspot.com/o/spaces%2FZ9sinLUl52lDK1vg6b8g%2Fuploads%2Fse1Ib0F4IuYeN8dgfaQV%2Fimage.png?alt=media&#x26;token=e3bcc3ab-d6c6-4c99-8c82-f5ad1eb0f5ce" alt=""><figcaption></figcaption></figure>

* **Actions**: Shows the available action options:

<figure><img src="https://1687673077-files.gitbook.io/~/files/v0/b/gitbook-x-prod.appspot.com/o/spaces%2FZ9sinLUl52lDK1vg6b8g%2Fuploads%2FzyqJH9II0Yt2ICb06STc%2Fimage.png?alt=media&#x26;token=2793cf83-0365-4645-b0b4-eb0590d42640" alt=""><figcaption></figcaption></figure>

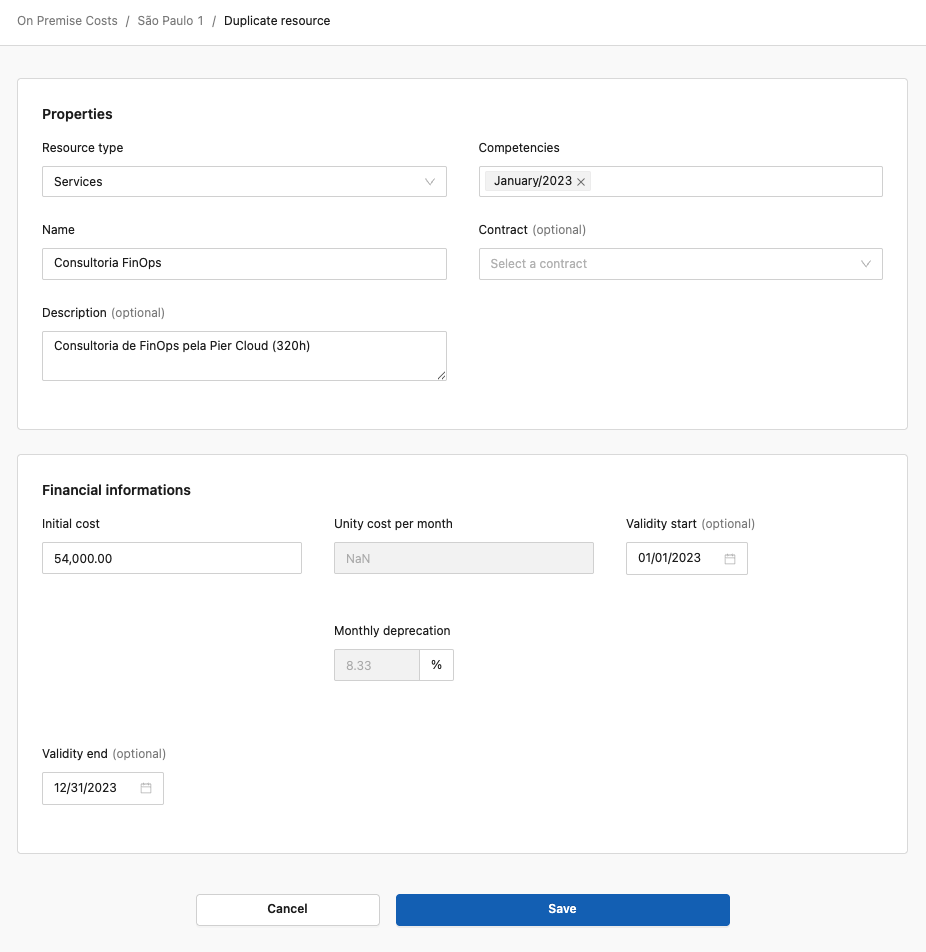
**Duplicate resource:** By clicking the “ ![](https://1687673077-files.gitbook.io/~/files/v0/b/gitbook-x-prod.appspot.com/o/spaces%2FZ9sinLUl52lDK1vg6b8g%2Fuploads%2FgovMltELq2Kq4IKg1ZqX%2Fimage.png?alt=media\&token=3f2e6fc6-53ab-45bd-91d3-ac389bbd6345)” icon, the system will display a screen allowing you to edit the information of the resource you want to duplicate.

Note: The fields displayed may vary depending on the resource type.

<figure><img src="https://1687673077-files.gitbook.io/~/files/v0/b/gitbook-x-prod.appspot.com/o/spaces%2FZ9sinLUl52lDK1vg6b8g%2Fuploads%2FpjCu4ZwzVFz31G3BTwXW%2Fimage.png?alt=media&#x26;token=61f0a9c8-e809-46dd-9327-8af39d7ab6c2" alt=""><figcaption></figcaption></figure>

**Delete resource:** By clicking the “![](https://1687673077-files.gitbook.io/~/files/v0/b/gitbook-x-prod.appspot.com/o/spaces%2FZ9sinLUl52lDK1vg6b8g%2Fuploads%2F6PbrZKFGnJWETglvPFM0%2Fimage.png?alt=media\&token=e2f6909f-2922-4cd8-81f5-819027f57133)” icon, the system will delete the selected resource.

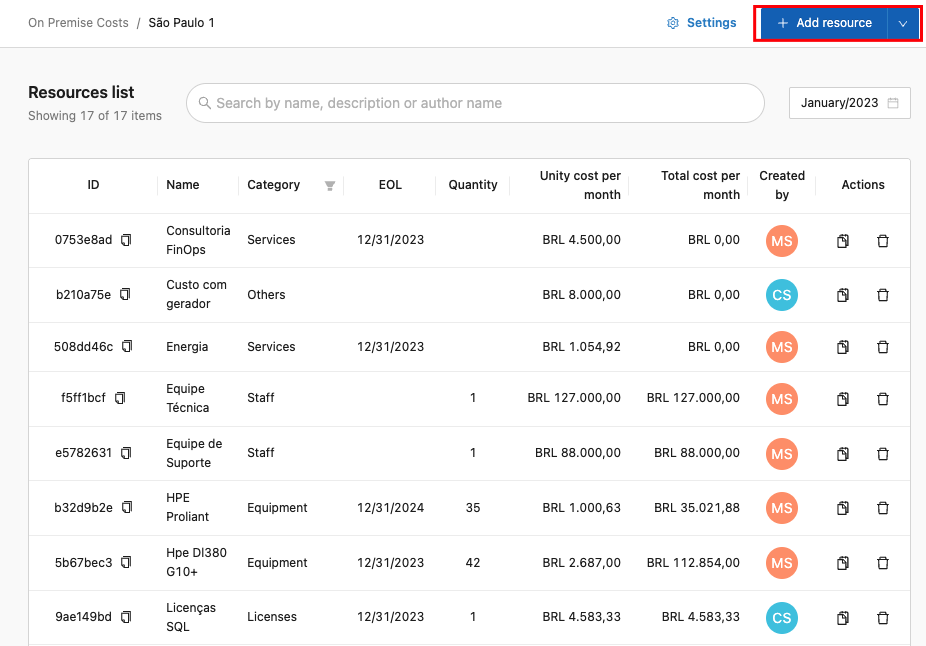
8. On this screen, you can also register new resources by clicking the “**+ Add resources**” button.

<figure><img src="https://1687673077-files.gitbook.io/~/files/v0/b/gitbook-x-prod.appspot.com/o/spaces%2FZ9sinLUl52lDK1vg6b8g%2Fuploads%2FbqyyNtAih0eWQe0Lt9ND%2Fimage.png?alt=media&#x26;token=e3e334ec-363f-452f-bbe6-89ca0739d1d0" alt=""><figcaption></figcaption></figure>

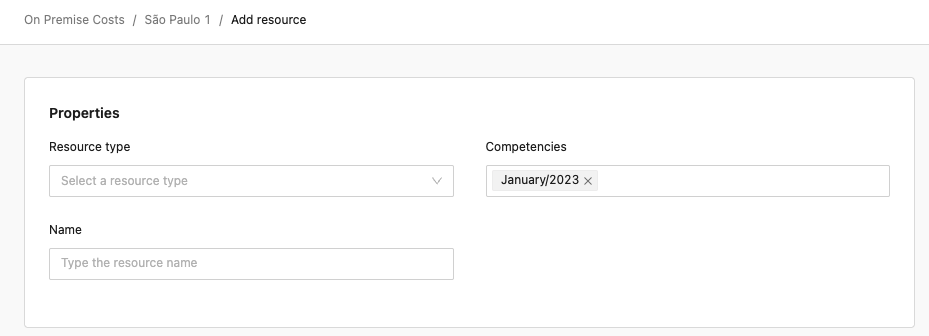
9. The system will display the screen for registering new resources:

<figure><img src="https://1687673077-files.gitbook.io/~/files/v0/b/gitbook-x-prod.appspot.com/o/spaces%2FZ9sinLUl52lDK1vg6b8g%2Fuploads%2FWPbkbJXU2m7qZA8Lp7On%2Fimage.png?alt=media&#x26;token=e881ad92-5c0c-469b-a3b3-c8fb07ce3c98" alt=""><figcaption></figcaption></figure>

10. You will need to enter the following information:

* **Resource type:** Select the type of resource you want to register from the available options (**Equipment, Licenses, Services, Team, or Others)**.
* **Periods:** Specify the months to which this resource applies.
* **Name:** Enter a name for the resource you want to register.

For each selected resource type, the system will request additional information, which will be detailed below.
